Sourdough sandwich bread has become a beloved staple for bread enthusiasts seeking a healthier, richer, and more flavorful alternative to conventional loaves.
This rustic yet soft bread uses a naturally fermented sourdough starter instead of commercial yeast, imparting a distinctive tang and tender crumb that pairs perfectly with both sweet and savory fillings. Sourdough bread has roots stretching back thousands of years and was the standard before the invention of commercial yeast.
Its recent resurgence is thanks to both its unique flavor profile and its potential health benefits, making it a go-to for those passionate about traditional baking.
One of the great appeals of sourdough sandwich bread is its versatility - it works equally well as the foundation for a classic BLT, an elegant grilled cheese, or simple toast with butter.
At the heart of this bread is a slow fermentation process, which not only develops flavor but also makes it easier to digest and stores beautifully, lasting several days without losing its texture.
Home bakers love crafting sourdough sandwich bread because, while it requires a bit more patience than standard sandwich bread, the rewarding results speak for themselves.
This comprehensive guide will walk you through the ingredients, process, and tips to ensure you create the perfect loaf every time, helping you master the art of sourdough sandwich bread from the comfort of your own kitchen.
Ingredients
- 500g bread flour (about 4 cups)
- 350g water, at room temperature (about 1 ½ cups)
- 100g active sourdough starter (about ½ cup), at 100% hydration
- 10g fine sea salt (about 2 teaspoons)
- 30g unsalted butter, softened (about 2 tablespoons)
- Optional: 15g honey or sugar (about 1 tablespoon) for a touch of sweetness
- Butter or oil, for greasing the pan
Instructions
- Feed your sourdough starter 4-6 hours ahead to be bubbly and active for baking.
- In a large mixing bowl, combine bread flour and water. Mix until just combined. Cover and let autolyse for 30-45 minutes.
- Add the active sourdough starter and salt to the dough. Mix thoroughly until well incorporated.
- Knead the dough by hand or with a stand mixer (using the dough hook) for 4-6 minutes until it comes together and begins to smooth out.
- Add the softened butter (and honey/sugar if using) and knead until the dough is supple, shiny, and passes the windowpane test.
- Transfer the dough to a lightly greased bowl and cover with plastic wrap or a damp towel. Let it bulk ferment at room temperature for 4-5 hours, performing a set of coil folds or stretch-and-folds every 30 minutes during the first 2 hours.
- After bulk fermentation, the dough should have visibly risen and be slightly domed. Lightly flour a surface, turn out the dough, and gently shape it into a rectangle.
- Roll up the dough tightly (like a jelly roll) and pinch the seam closed, maintaining surface tension. Place seam side down into a greased loaf pan (8.5x4.5 inches or 9x5 inches).
- Cover loosely and allow the dough to proof until it has risen about 1 inch above the rim of the pan, usually 2-4 hours at room temperature, or overnight in the refrigerator for a slower, more developed flavor.
- Preheat your oven to 375°F (190°C). If desired, lightly score the top of the loaf with a sharp knife.
- Bake in the center of the oven for 35-40 minutes, until the top is golden brown and the loaf sounds hollow when tapped. The internal temperature should read 200-205°F (93-96°C).
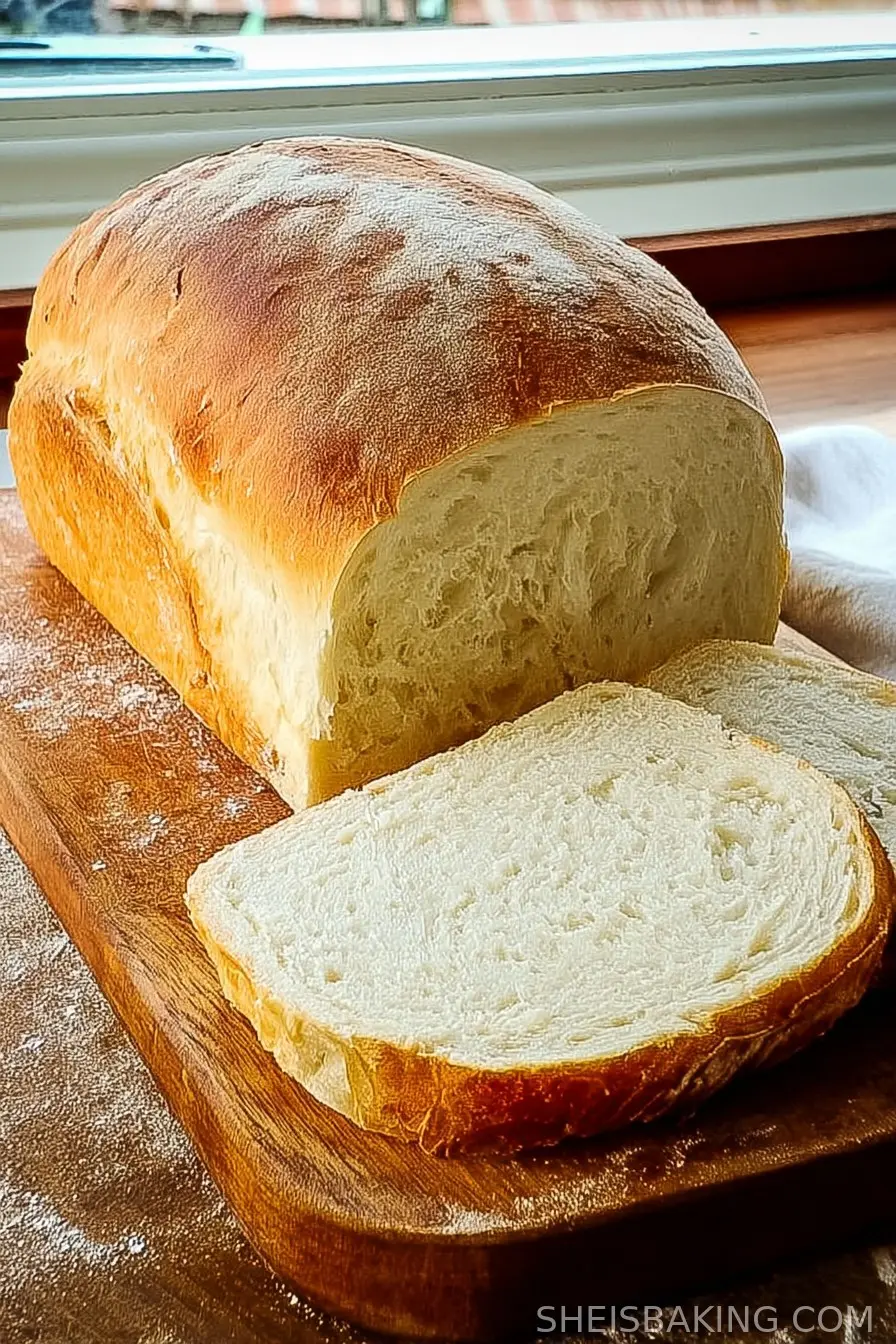
- Remove from the oven and cool in the pan for five minutes, then transfer to a wire rack. Cool completely before slicing to preserve the soft crumb.
Nutritional Information
Sourdough sandwich bread is a wholesome choice compared to many processed sandwich breads, providing a more natural blend of ingredients and fewer additives. Each typical slice (based on a 500g-batch loaf yielding 14-16 slices) offers approximately 100-110 calories, 22g carbohydrates, 3g protein, and less than 2g fat.
The bread is low in sugar-especially if you omit the optional sweetener-and contains virtually no cholesterol. Notably, the long fermentation process associated with sourdough breaks down gluten and phytic acid, making nutrients more bioavailable and the bread easier for some people to digest.
The protein content supports satiety and muscle maintenance, while the carbohydrates offer an energy boost that is balanced by the bread's fiber and modest fat content.
Since sourdough sandwich bread uses robust bread flour and a sourdough starter, it typically contains small amounts of minerals such as iron, magnesium, and B vitamins.
Unlike store-bought loaves, homemade sourdough sandwich bread contains no preservatives, synthetic dough conditioners, or unnecessary sugar, making it a cleaner, more nutritious option for everyday sandwiches. For those looking to introduce more whole foods into their diet, sourdough sandwich bread is an excellent foundation for balanced, nourishing meals.
Wine and Beverage Pairings
Sourdough sandwich bread's nuanced, tangy flavor pairs beautifully with a variety of beverages. For a traditional accompaniment, try a light-bodied white wine such as Sauvignon Blanc or Pinot Grigio, which complement rather than overpower the bread's subtle sour notes.
If serving the bread as part of a cheese platter or with a robust filling, a medium-bodied red wine like Merlot or Pinot Noir works well. For non-alcoholic options, a tart, cold-pressed apple cider or freshly brewed iced tea enhances the bread's flavor and refreshes the palate.
Classic breakfast pairings include freshly brewed coffee or a delicately floral green tea, while a glass of cold milk creates a nostalgic, comforting snack.
Cooking Tips and Variations
Mastering sourdough sandwich bread requires attention to a few important details and leaves room for creative variation. If you are new to handling sourdough, remember that timing is key-don't rush fermentation stages, as this is where the bread's signature flavor and texture develop.
Always use an active, vigorous starter for the best rise and crumb structure. For a softer, fluffier loaf, make sure you knead until the dough is truly elastic and smooth, incorporating the butter gradually. If you wish for a tangier flavor, lengthen the cold refrigerator proofing phase overnight.
For a touch of richness, use milk in place of all or part of the water. You can introduce whole wheat flour for extra nutrition, but be prepared to add slightly more water to compensate for its absorbency.
For creative variations, consider folding in seeds (like flax, chia, or sunflower), adding dried herbs, or swirling with cheese for a savory twist. If you want a sweeter breakfast bread, include a touch of honey and a sprinkle of cinnamon.
Always let the bread cool fully before slicing to keep the crumb soft and prevent it from becoming gummy. With practice, you can easily adapt this base sourdough sandwich bread recipe to suit your taste preferences and dietary needs.

Serving Suggestions
Sourdough sandwich bread is a versatile staple that shines in countless serving scenarios. Its soft but structured crumb makes it ideal for classic sandwiches, from a turkey club layered with crisp lettuce and juicy tomatoes to a humble peanut butter and jelly lunchbox favorite.
For breakfast, toast thick slices and serve them with butter, jam, honey, or even mashed avocado for a wholesome start to the day. If you enjoy grilled cheese, sourdough sandwich bread provides the perfect balance of crunch and chew, ensuring gooey, melty centers with crisp, golden exteriors.
The bread's mild tang also elevates more sophisticated open-faced sandwiches topped with smoked salmon, crème fraîche, and capers, or roast beef with caramelized onions and arugula. For entertaining or feeding a crowd, turn your loaf into finger sandwiches for tea parties, picnics, or buffets.
It can also be used as the base for savory French toast, croutons for salads, or as the centerpiece for an artisanal charcuterie board.
The loaf's sturdy yet tender crumb means it stands up well to spreads, dips, and hearty fillings, making sourdough sandwich bread an essential choice for everyday meals as well as special occasions.
Health Benefits
Sourdough sandwich bread delivers an array of health advantages that distinguish it from other bread varieties. Thanks to the fermentation process, beneficial probiotics called lactobacilli develop, which can promote gut health and aid digestion, although most bacteria are inactivated during baking.
The slow fermentation breaks down gluten and phytates, potentially making sourdough easier to digest for those with mild gluten sensitivities (though not safe for those with celiac disease). The natural leavening also contributes to a lower glycemic index compared to conventional white bread, resulting in less dramatic blood sugar spikes.
Sourdough sandwich bread is free of artificial additives, preservatives, and excessive sugars that are often present in pre-packaged breads.
Additionally, when made with whole grain or partial whole wheat flour, it can be a good source of fiber, certain B vitamins, iron, and magnesium, all of which support heart, immune, and metabolic health.
For those aiming to eat clean or increase their intake of whole foods, sandwich bread made with sourdough is an excellent, nutritious, and satisfying choice.
Frequently Asked Questions
Yes, you can use all-purpose flour, but bread flour will give your sourdough sandwich bread a chewier texture and better gluten development, resulting in a higher rise and more structured crumb.
Store the fully cooled loaf in a bread bag, paper bag, or beeswax wrap at room temperature for up to four days. For longer storage, slice and freeze the loaf, then toast slices directly from the freezer as needed.
Dense bread can result from under-proofing (not letting the dough rise enough), using an inactive starter, over-kneading, or using too much flour. Ensure your starter is active and bubbly and allow the dough to rise fully during both fermentation and proofing stages.
Absolutely. Simply substitute the butter with a plant-based alternative (such as olive oil or vegan butter) and omit honey or use a plant-based sweetener if desired.
Traditional sourdough sandwich bread is not gluten-free, as it uses wheat flour. However, there are specific gluten-free sourdough recipes that use alternative flours and require a gluten-free starter.
Learning to bake sourdough sandwich bread opens up a world of delicious possibilities in the kitchen. With its signature tang, soft crumb, and adaptability, this homemade bread can transform any meal into a memorable occasion. Whether you're a novice baker or an experienced sourdough enthusiast, practice and patience will reward you with loaves that surpass anything found on store shelves. Once you've mastered this basic recipe, feel free to experiment with flavors, fillings, and techniques to make every loaf uniquely your own. Share it with family and friends and enjoy the incredible taste and nourishment that only homemade sourdough sandwich bread can provide.
Ingredients
- 500g bread flour (about 4 cups)
- 350g water, at room temperature (about 1 ½ cups)
- 100g active sourdough starter (about ½ cup), at 100% hydration
- 10g fine sea salt (about 2 teaspoons)
- 30g unsalted butter, softened (about 2 tablespoons)
- Optional: 15g honey or sugar (about 1 tablespoon) for a touch of sweetness
- Butter or oil, for greasing the pan
Instructions
-
1Feed your sourdough starter 4-6 hours ahead to be bubbly and active for baking.
-
2In a large mixing bowl, combine bread flour and water. Mix until just combined. Cover and let autolyse for 30-45 minutes.
-
3Add the active sourdough starter and salt to the dough. Mix thoroughly until well incorporated.
-
4Knead the dough by hand or with a stand mixer (using the dough hook) for 4-6 minutes until it comes together and begins to smooth out.
-
5Add the softened butter (and honey/sugar if using) and knead until the dough is supple, shiny, and passes the windowpane test.
-
6Transfer the dough to a lightly greased bowl and cover with plastic wrap or a damp towel. Let it bulk ferment at room temperature for 4-5 hours, performing a set of coil folds or stretch-and-folds every 30 minutes during the first 2 hours.
-
7After bulk fermentation, the dough should have visibly risen and be slightly domed. Lightly flour a surface, turn out the dough, and gently shape it into a rectangle.
-
8Roll up the dough tightly (like a jelly roll) and pinch the seam closed, maintaining surface tension. Place seam side down into a greased loaf pan (8.5x4.5 inches or 9x5 inches).
-
9Cover loosely and allow the dough to proof until it has risen about 1 inch above the rim of the pan, usually 2-4 hours at room temperature, or overnight in the refrigerator for a slower, more developed flavor.
-
10Preheat your oven to 375°F (190°C). If desired, lightly score the top of the loaf with a sharp knife.
-
11Bake in the center of the oven for 35-40 minutes, until the top is golden brown and the loaf sounds hollow when tapped. The internal temperature should read 200-205°F (93-96°C).
-
12Remove from the oven and cool in the pan for five minutes, then transfer to a wire rack. Cool completely before slicing to preserve the soft crumb.
Approximate Information for One Serving
Nutrition Disclaimers
Number of total servings shown is approximate. Actual number of servings will depend on your preferred portion sizes.
Nutritional values shown are general guidelines and reflect information for 1 serving using the ingredients listed, not including any optional ingredients. Actual macros may vary slightly depending on specific brands and types of ingredients used.
To determine the weight of one serving, prepare the recipe as instructed. Weigh the finished recipe, then divide the weight of the finished recipe (not including the weight of the container the food is in) by the desired number of servings. Result will be the weight of one serving.
Did you make this recipe?
Please consider Pinning it!


Leave a Reply