Discover the joy of baking with this Easy Dutch Oven No Knead Bread recipe, designed for both beginners and seasoned bakers seeking exceptional results with minimal effort.
The allure of fresh, homemade bread has timeless appeal, and with the rise of artisanal bread making at home, no knead bread has surged in popularity for its simplicity and remarkable outcome.
Traditional bread baking typically involves lengthy kneading sessions, but this no knead method, popularized in recent decades, has revolutionized home bread making. By substituting mechanical kneading with an extended fermentation period, the dough develops robust flavor and texture naturally.
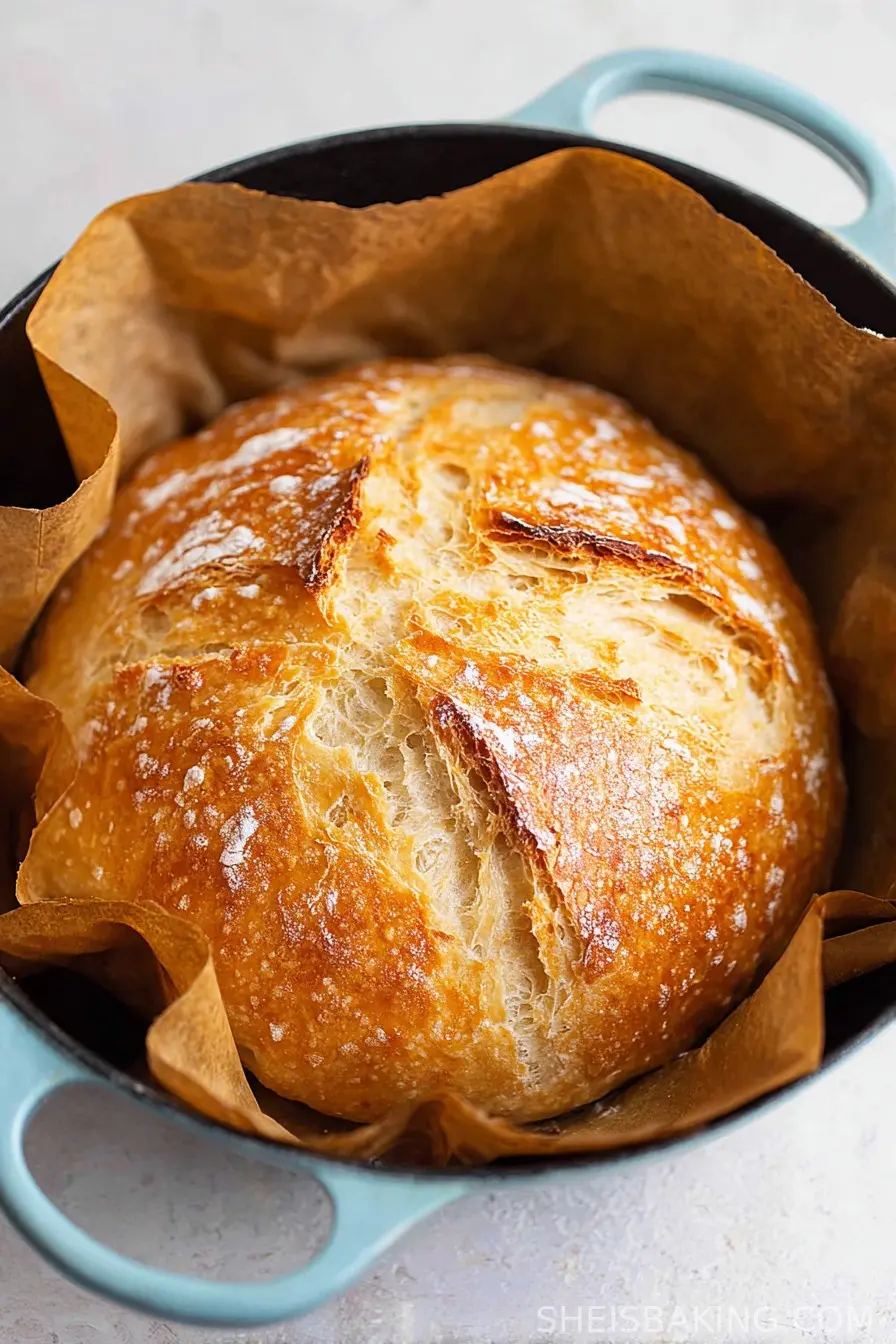
The Dutch oven, a reliable kitchen staple, provides the ideal environment for baking-the heavy lid traps steam, creating a crisp, golden crust while ensuring the crumb remains moist and airy. This Easy Dutch Oven No Knead Bread recipe calls for only a handful of ingredients-flour, water, salt, and yeast.
The result is a rustic, bakery-quality loaf boasting a chewy exterior and tender interior. Whether you are a novice baker or simply short on time, this method makes homemade bread accessible and rewarding.
The process is virtually foolproof and fits seamlessly into any schedule, requiring only a few minutes of active preparation and yielding exceptional bread that rivals the offerings of your favorite bakery.
Embrace the tradition of bread baking and treat yourself to the aroma and taste of this Easy Dutch Oven No Knead Bread right from your own kitchen.
Ingredients
- 3 ¼ cups (410g) all-purpose flour
- 1 ½ teaspoons salt
- ½ teaspoon instant yeast or active dry yeast
- 1 ½ cups (360ml) lukewarm water
- 1 teaspoon sugar (optional, for a hint of sweetness)
- Extra flour or cornmeal for dusting
Instructions
- In a large mixing bowl, combine the flour, salt, yeast, and sugar (if using). Stir to mix the dry ingredients thoroughly.
- Pour in the lukewarm water and use a wooden spoon or spatula to stir until a shaggy, sticky dough forms. Do not knead.
- Cover the bowl tightly with plastic wrap or a clean kitchen towel, and let the dough rest at room temperature for 12-18 hours. The dough is ready when it has doubled in size and is dotted with bubbles.
- Lightly flour a clean surface. Turn the risen dough onto the surface and, with floured hands, gently fold the dough over on itself a couple of times to shape into a round loaf. Avoid overhandling.
- Place the shaped dough on a piece of parchment paper. Dust the top with flour or cornmeal and loosely cover with plastic wrap or a towel. Let it rest for 30-60 minutes while you preheat the oven.
- Preheat your oven to 450°F (230°C). Place a Dutch oven (with the lid) inside the oven to heat up for at least 30 minutes.
- Once the Dutch oven is fully heated, carefully remove it using oven mitts. Lift the parchment with the dough and transfer both into the hot Dutch oven. Cover with the lid.
- Bake for 30 minutes with the lid on. Then remove the lid and bake for an additional 12-15 minutes, or until the bread is deep golden and the crust is crisp.
- Carefully lift the bread out of the Dutch oven using the parchment paper. Let it cool on a wire rack for at least one hour before slicing to allow the crumb to set.
- Slice and enjoy your Easy Dutch Oven No Knead Bread fresh, or store in an airtight container for up to three days.
Nutritional Information
With this Easy Dutch Oven No Knead Bread, you are not only enjoying a flavor-packed loaf but also benefiting from relatively wholesome, straightforward ingredients. A single slice (about 1/12th of the loaf) typically offers approximately 120-140 calories, depending on thickness and additional ingredients.
This bread is low in fat and contains no added oils or dairy, making it suitable for vegan diets and those seeking low-fat options. The primary nutrient contribution comes from complex carbohydrates, which provide sustained energy, and a modest amount of protein (about 3-4 grams per serving) from the flour.
There is roughly 1-2 grams of fiber per slice if you use all-purpose flour, with slightly higher content if you substitute some whole wheat flour. The sodium content is determined primarily by the amount of salt added, so those monitoring sodium intake can adjust accordingly.
There is little to no sugar unless the optional teaspoon is included. This bread is free of cholesterol and trans fats. By using high-quality flour and controlling the ingredients, this Easy Dutch Oven No Knead Bread can complement various eating plans.
For enhanced nutrition, consider adding seeds or nuts, or swapping in whole-grain flour for a fiber boost.
Wine and Beverage Pairings
A freshly baked loaf of Easy Dutch Oven No Knead Bread pairs marvelously with a wide variety of beverages. Classic choices include a robust cup of coffee or a soothing tea, which accentuate both the aromas and subtle flavors of the bread.
If you are enjoying your bread with dinner, consider pairing it with a crisp Sauvignon Blanc or a light, fruity Pinot Noir; both wines complement the rustic tang and browned crust.
A refreshing sparkling water with a hint of lemon is an excellent non-alcoholic pairing that balances the bread's hearty texture. For heartier meals, a craft beer such as a Belgian-style ale or a wheat beer complements the chewy crumb and enhances the overall dining experience.
For breakfast or brunch, orange juice or herbal infusions provide a bright contrast to the savory bread, making every bite memorable.
Cooking Tips and Variations
To ensure your Easy Dutch Oven No Knead Bread yields perfect results every time, consider these helpful baking tips and ways to adapt the recipe for different palates.
For a lighter, airy crumb, resist the temptation to add extra flour even if the dough seems too sticky-slack dough creates more open texture. Always preheat your Dutch oven thoroughly to create the signature crispy crust.
Experiment by adding mix-ins such as chopped nuts, seeds, dried herbs, or olives to the dough before the first rise for unique flavor variations. For a slightly tangy twist, extend the fermentation period by refrigerating the dough overnight after the initial rise, which also develops flavor.
If you prefer a chewier loaf, use bread flour in place of all-purpose flour. Whole wheat or rye flour can substitute up to half of the white flour for added robustness and nutrition, though you may need a touch more water. Cornmeal dusting provides a pleasant crunch and prevents sticking.
If you lack a Dutch oven, a heavy-duty oven-safe pot with a tight-fitting lid can suffice. Scoring the top of the dough before baking gives a professional appearance and allows controlled expansion during baking. Lastly, allow the finished bread to cool completely for the best possible slicing and texture.

Serving Suggestions
Easy Dutch Oven No Knead Bread can take center stage at any meal, whether served as a simple side or the main event. For breakfast, enjoy it lightly toasted and topped with butter, jam, or avocado for a nourishing start.
It is well-suited to classic pairings with scrambled eggs, spreads, or soft cheeses. At lunchtime, transform slices into gourmet sandwiches-think roasted vegetables, fresh greens, and a drizzle of olive oil. The sturdy crust and airy crumb hold up well to spreading and stuffing.
At dinner, serve thick slices alongside soup, salads, or stews to soak up every last bit of flavor. For appetizers, cut the bread into cubes, brush with olive oil, and toast for homemade croutons, or arrange slices on a charcuterie board with cured meats and cheeses.
For a special touch, drizzle slices with flavored oils, rub with garlic, or use as dippers in fondue. No matter how you serve it, the bread's aroma and satisfying texture enhance every meal. Its versatility makes it a beloved staple for holidays, gatherings, and everyday occasions alike.
Health Benefits
Homemade Easy Dutch Oven No Knead Bread provides several health advantages over processed, commercially made breads. By preparing it yourself, you can carefully control the ingredients and eliminate unnecessary additives and preservatives often found in store-bought loaves.
The short ingredient list-flour, yeast, salt, and water-means the bread is free from artificial coloring and flavor enhancers. Opting for whole grain flours increases fiber, vitamins, and minerals, supporting digestive health and stable energy levels. This bread's fermentation process also enhances flavor while slightly improving nutrient bioavailability.
The absence of added fat and sugar makes it suitable for those managing cholesterol, blood sugar, or weight. It easily fits a vegetarian or vegan diet and can be adapted for whole foods or plant-based diets. If you are monitoring sodium, you can reduce the salt or choose salt substitutes.
Plus, making bread at home adds a mindful, meditative ritual to your day, promoting a positive relationship with food. For those with food sensitivities, gluten-free flours can be tested, though results may vary.
Frequently Asked Questions
Can I make Easy Dutch Oven No Knead Bread with whole wheat flour?
Yes, you can substitute up to half of the all-purpose flour with whole wheat flour for a denser, more flavorful loaf. You may need to add a few extra tablespoons of water to achieve the correct dough consistency.

Do I need a Dutch oven to make this bread?
While a Dutch oven is ideal for creating steam and a crusty exterior, you can use any heavy-duty oven-safe pot with a tight-fitting lid. Avoid glass as it may not withstand high baking temperatures.
How can I tell when the bread is fully baked?
The crust should be golden brown and crisp. You can also tap the bottom of the loaf-if it sounds hollow, it's fully baked. Internal temperature can be checked (around 200°F/93°C is perfect).
Can I freeze Easy Dutch Oven No Knead Bread?
Absolutely! Allow the bread to cool completely, slice if desired, and wrap tightly in plastic wrap or foil. Store in a freezer bag for up to three months. Thaw at room temperature or toast slices directly from frozen.
Why is my bread dense or gummy?
Dense or gummy bread often results from underbaking or a dough that has not risen enough. Ensure your yeast is active, give the dough ample rise time, and bake until deeply golden for best texture.
Baking Easy Dutch Oven No Knead Bread at home is both an enjoyable experience and a practical way to fill your kitchen with the aroma of fresh, crusty bread. This approachable method guarantees consistent, impressive results every time, inviting both novices and seasoned bakers to craft bakery-quality bread without the need for kneading. The versatility, flavor, and texture of this bread make it a perfect addition to meals throughout the day. With only a few common ingredients, you can create something truly special-tailored to your tastes and dietary needs. Make Easy Dutch Oven No Knead Bread, and enjoy the satisfaction of homemade bread that exceeds expectations in both simplicity and flavor.
Ingredients
- 3 cups all-purpose flour
- 1 ½ teaspoons salt
- ½ teaspoon instant yeast
- 1 ½ cups warm water
- 1 tablespoon olive oil (for greasing)
- 1 tablespoon cornmeal or flour (for dusting)
- Optional: 1 teaspoon sugar
- Optional: 1 tablespoon chopped fresh herbs (rosemary, thyme, or parsley)
Instructions
-
1In a large bowl, whisk together the flour, salt, instant yeast, and sugar (if using).
-
2Pour in the warm water and stir with a wooden spoon until a shaggy dough forms. Mix in the fresh herbs, if using.
-
3Cover the bowl with plastic wrap and let the dough rest at room temperature for 12 hours, or overnight, until bubbly and doubled in size.
-
4Preheat oven to 450°F (232°C). Place a Dutch oven with lid inside to heat for 30 minutes.
-
5Turn the dough onto a floured piece of parchment paper. Shape gently into a round loaf. Sprinkle cornmeal or flour on top.
-
6Carefully remove hot Dutch oven, grease with olive oil, and transfer dough (with parchment) inside. Cover and bake for 30 minutes, then remove lid and bake 10-15 minutes more until golden and crusty. Cool before slicing.
Approximate Information for One Serving
Nutrition Disclaimers
Number of total servings shown is approximate. Actual number of servings will depend on your preferred portion sizes.
Nutritional values shown are general guidelines and reflect information for 1 serving using the ingredients listed, not including any optional ingredients. Actual macros may vary slightly depending on specific brands and types of ingredients used.
To determine the weight of one serving, prepare the recipe as instructed. Weigh the finished recipe, then divide the weight of the finished recipe (not including the weight of the container the food is in) by the desired number of servings. Result will be the weight of one serving.
Did you make this recipe?
Please consider Pinning it!!


Leave a Reply