The No-Bake Oreo Cheesecake Pie with Chocolate Graham Crust is the ultimate crowd-pleasing dessert that brings together the irresistible flavors of cookies and cream with a luscious, creamy cheesecake texture. In today's fast-paced world, desserts that combine convenience and decadence are always in high demand.
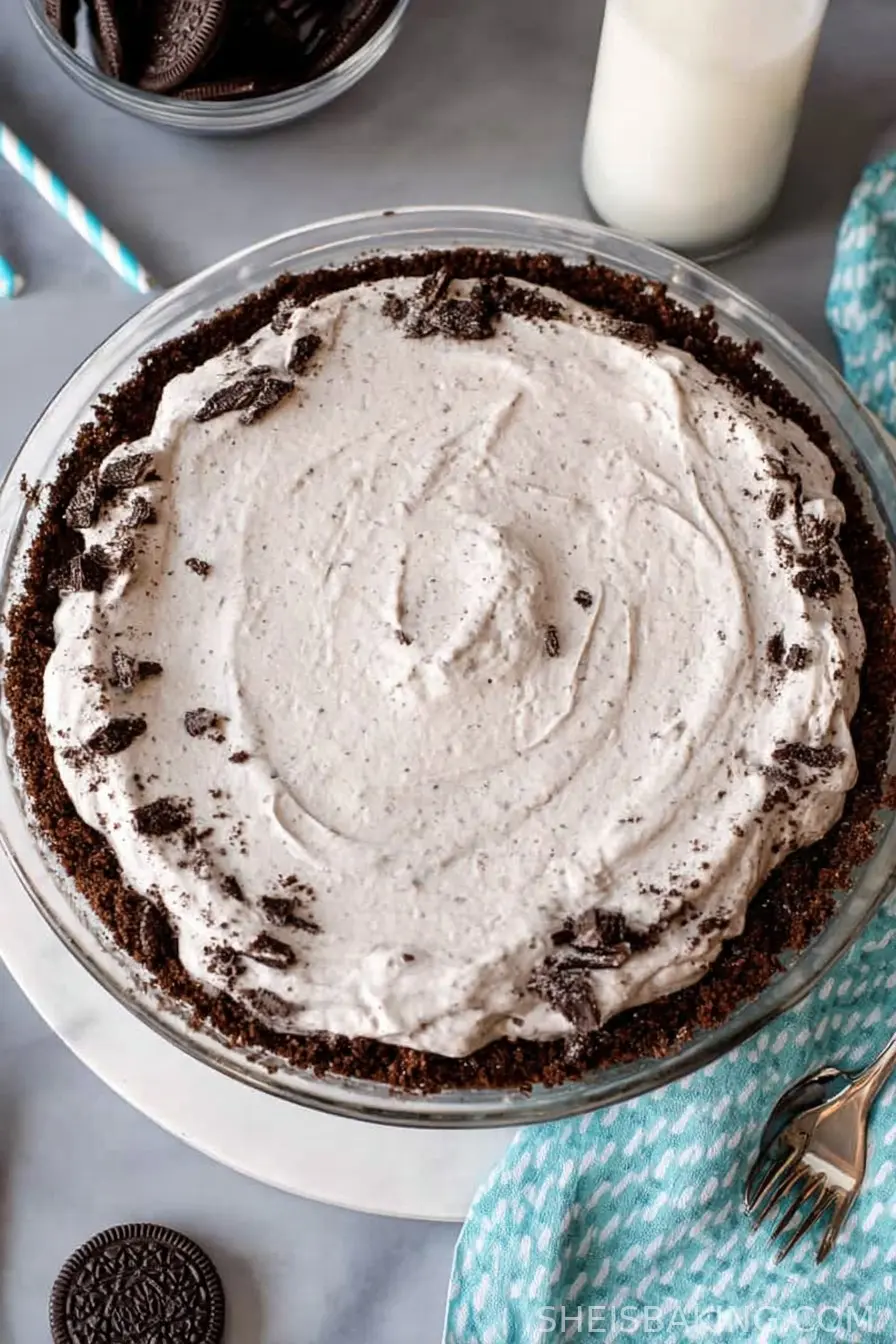
This recipe showcases a harmonious blend of a homemade chocolate graham cracker crust and a silky Oreo-studded cheesecake filling, all topped with a lavish layer of whipped topping and extra Oreo crumbles for that perfect finish.
The no-bake element (for the filling) makes this pie not only easy and approachable for beginner bakers but also reduces preparation time, making it a practical choice for parties, family gatherings, or just an indulgent night in.
The history of Oreo desserts stretches back decades-Oreos first appeared on the market in 1912 and quickly became a classic cookie for snacking, baking, and dessert innovation. Cheesecake, with ancient roots in Greek cuisine, made its way into American kitchens and underwent countless creative adaptations.
The marriage of Oreos and cheesecake, especially in a pie form with a chocolate graham crust, is a relatively modern invention but has quickly become a beloved staple at potlucks and birthday parties.
This recipe is not only delicious but also leverages the nostalgia of Oreo cookies, ensuring every bite is both familiar and exciting.
Keywords such as "easy no-bake dessert," "Oreo cheesecake pie," "chocolate graham crust," and "pie for parties" are all relevant for this recipe, making it highly discoverable and perfect for those seeking a simple yet impressive sweet treat.
Whether you are a novice baker looking to impress or a dessert aficionado searching for your next favorite, this No-Bake Oreo Cheesecake Pie with Chocolate Graham Crust is sure to become a keeper in your recipe collection.
Ingredients
- 12 sheets of chocolate graham crackers
- 5 tablespoons unsalted butter, melted
- 2 tablespoons granulated sugar
- 1 small box (3.4 oz) cheesecake pudding mix
- 1 ¼ cups cold milk
- 1 8-ounce container extra-creamy whipped topping, divided
- 4 ounces cream cheese, softened
- 12 Oreo cookies, finely crushed
- 3 Oreo cookies, crushed (for topping)
Instructions
- Begin by preparing the chocolate graham cracker crust. Preheat your oven to 350°F (175°C) to ensure it reaches the right temperature while you assemble the other ingredients.
- Break the chocolate graham crackers into pieces and place them in a food processor. Pulse until the crackers turn into uniform, fine crumbs. This ensures a consistent crust that will hold together well.
- Pour the melted unsalted butter and granulated sugar into the food processor with the crumbs. Pulse several times until the mixture looks like damp sand and starts to clump when pressed between your fingers. This texture is crucial for a sturdy pie base.
- Transfer the graham mixture into a 9-inch pie dish. Use the bottom of a measuring cup or clean hands to press the crumbs firmly and evenly across the bottom and slightly up the sides of the dish. Compacting the crust well will prevent it from crumbling after baking.
- Bake the chocolate graham crust in the preheated oven for 8 to 10 minutes. This brief baking period helps the crust set and brings out a deeper chocolate flavor. Remove from the oven and let it cool completely before adding the filling. Cooling is essential to avoid melting the cheesecake mixture later.
- As the crust cools, focus on the Oreo cheesecake filling. Place the softened cream cheese in a mixing bowl and beat it with a hand mixer on medium speed until it becomes completely smooth and lump-free. This step ensures a creamy, even base for the filling.
- Pour the cold milk into the bowl with the cream cheese, then sprinkle the cheesecake pudding mix over the top. Use an electric mixer to beat the mixture for 1 to 2 minutes, or until it thickens to a custard-like consistency. The pudding mix stabilizes the filling and imparts classic cheesecake flavor.
- Gently fold in 8 ounces of extra-creamy whipped topping and the 12 finely crushed Oreo cookies. Use a spatula and a light hand to combine, ensuring the filling remains fluffy and the cookies are evenly dispersed without deflating the mixture.
- Spoon the finished Oreo cheesecake filling into the completely cooled chocolate graham cracker crust. Use a spatula to spread the filling smoothly and evenly, creating an inviting surface for the toppings.
- Cover the pie and transfer it to the refrigerator. Allow it to chill for at least four hours, although refrigerating overnight yields the best texture and flavor as the filling fully sets.
- Before serving, spread the remaining 4 ounces of whipped topping over the chilled pie in an even layer. For a decorative and crunchy finish, sprinkle the top with the 3 crushed Oreo cookies.
- Use a sharp knife, dipped in hot water for clean slices, to portion the pie, and serve cold to enjoy the creamy texture and rich flavors at their best.
Nutritional Information
This No-Bake Oreo Cheesecake Pie with Chocolate Graham Crust is a decadent dessert that balances rich flavor with a satisfyingly creamy texture. Made with classic ingredients such as cream cheese, whipped topping, pudding mix, and the iconic Oreo cookies, it's certainly a treat best enjoyed in moderation.
Each serving (assuming 8 slices per pie) is estimated to provide approximately 420-500 calories, depending on the exact brands used.
This pie is high in carbohydrates, primarily from the graham crackers, Oreos, and pudding mix, which provide quick energy but should be balanced against the rest of your diet if you're watching your sugar intake.
The cream cheese and whipped topping contribute saturated fat, which, while adding to the smooth mouthfeel and luxurious flavor, also means this dessert is higher in fat than some lighter options. The pudding mix adds a modest amount of protein and calcium, particularly when paired with milk and cream cheese.
Oreos deliver a delightful crunch along with additional sugar and fat content. While nutritional details may vary, enjoying a moderate slice paired with fresh fruit or a cup of coffee can make for a pleasant and satisfying dessert experience without overindulgence.
As always, those with dietary restrictions related to dairy, gluten, or sugar should consider ingredient substitutions to suit their needs.

Wine and Beverage Pairings
A chilled glass of milk remains a classic and comforting choice with this rich dessert, as the creamy texture complements the chocolate and Oreo flavors perfectly. For a more grown-up pairing, opt for a lightly sweet dessert wine such as Moscato d'Asti, which balances the richness of the cheesecake filling.
Coffee and espresso are also excellent choices, as their slight bitterness contrasts with the sweetness of the pie. If you enjoy tea, try a robust black tea or a dessert-friendly herbal blend, such as mint or vanilla rooibos, to round out your dessert experience.
Cooking Tips and Variations
For the very best No-Bake Oreo Cheesecake Pie with Chocolate Graham Crust, there are a few helpful tips and creative variations to consider. Always make sure your cream cheese is properly softened before beating, as this results in a smoother, lump-free filling.
Chilling the pie for at least four hours is essential-it allows the filling to fully set and the flavors to meld beautifully; overnight chilling is optimal for a firmer texture.
When making the crust, press the chocolate graham cracker mixture firmly using a measuring cup to ensure it doesn't crumble when serving. If you don't have a food processor, the graham crackers can be placed in a resealable plastic bag and crushed with a rolling pin.
For extra richness, drizzle a bit of melted chocolate over the whipped topping or add a sprinkle of mini chocolate chips. Experiment with creative variations: try swapping in golden Oreos for a different flavor profile, or layer thinly sliced strawberries between the crust and filling for a fruity twist.
For those seeking a festive touch, top with seasonal decorations or sprinkles. This pie can easily be made ahead a day in advance, making it a stress-free option for gatherings.
If you prefer a completely no-bake dessert, you can skip the crust baking step and simply chill it, though baking will provide a slightly firmer, more cohesive base. Finally, always use a sharp, hot knife to cut neat slices-simply wipe the blade clean between cuts for picture-perfect presentation every time.

Serving Suggestions
Presenting your No-Bake Oreo Cheesecake Pie with Chocolate Graham Crust is just as important as making it. Serve it straight from the refrigerator for the creamiest, most refreshing texture.
Use a sharp knife dipped in warm water, wiping clean between cuts, to ensure each slice has clean edges and remains visually appealing on the plate. Add a dollop of extra whipped topping or a drizzle of chocolate syrup for special occasions.
For added flair, garnish each slice with an.extra mini Oreo or fresh berries to introduce some color contrast and a touch of tartness against the sweet filling. This pie makes a stunning centerpiece for birthday parties, holiday dinners, family reunions, or casual gatherings with friends.
Because it is rich and satisfying, smaller slices are ideal, which means your pie can go further and delight more guests. Pair each serving with a favorite beverage (such as coffee or milk) to create a full dessert experience that is both memorable and satisfying.
If you're looking to add a fresh element, consider serving alongside a bowl of sliced strawberries or raspberries. Their natural tartness and juiciness complement the sweet and creamy elements of the cheesecake, providing balance and refreshment.
For varied textures, offer a selection of crunchy toppings-such as extra Oreo crumbles, chopped nuts, or chocolate shavings-on the side so each guest can personalize their slice.
Health Benefits
While No-Bake Oreo Cheesecake Pie with Chocolate Graham Crust is undoubtedly an indulgent treat, it can still be enjoyed as part of a balanced lifestyle.
The use of dairy ingredients like cream cheese, milk, and whipped topping provides some calcium and protein, which contribute to healthy bones and assist in muscle function. The small portion of cream cheese adds a bit of vitamin A and some B vitamins as well.
Oreo cheesecake pies, however, are higher in sugars and fats, especially due to the Oreos, graham crackers, and whipped toppings. That said, this dessert has no added preservatives or artificial flavors beyond what comes in the packaged ingredients, making it a fresher, homemade option compared to many store-bought desserts.
If you are mindful of sugar intake or are catering to special dietary needs, you can adapt the recipe by using light cream cheese, reduced-fat whipped topping, or sugar-free pudding mix and Oreos.
Eating dessert mindfully and pairing it with fresh fruit, such as strawberries or bananas, can help balance the meal and provide satisfying sweetness along with extra fiber and nutrients. Ultimately, enjoying this pie in moderation can add a joyful, celebratory touch to your diet.
The pleasure of sharing a homemade dessert with loved ones also offers emotional well-being and creates lasting memories-important aspects of a healthy lifestyle as well.
Frequently Asked Questions
Yes, you can simply chill the pressed chocolate graham cracker crust instead of baking it. However, baking helps the crust hold together more firmly, especially during slicing and serving.
This pie can be made up to 24 hours in advance. In fact, chilling overnight enhances the texture and flavor. Wait to add the whipped topping and crushed Oreo garnish until just before serving for the freshest presentation.
The cheesecake pudding mix is essential for the flavor and structure of this recipe. If you cannot find it, vanilla pudding mix can be substituted in a pinch, though the final result will have a slightly different taste.
Absolutely, both regular and light varieties of whipped topping will work. Extra-creamy versions provide a richer mouthfeel, but lighter versions can reduce the overall fat and calorie content.
Yes, you can freeze the assembled pie before topping it. Thaw overnight in the refrigerator, then add whipped topping and Oreo garnish just before serving for the best texture.
The No-Bake Oreo Cheesecake Pie with Chocolate Graham Crust combines nostalgic flavors and irresistible textures in an easy-to-follow, crowd-pleasing recipe. Its chocolatey, crumbly base pairs perfectly with the creamy Oreo filling and whipped topping for a dessert that's sure to become a family favorite. With its simple preparation, striking presentation, and customizable nature, this pie delivers on both taste and convenience, making it ideal for everything from special celebrations to casual weeknight treats. Let this ultimate Oreo cheesecake pie elevate your dessert repertoire and bring joyful moments to your table.
Ingredients
- 12 sheets of chocolate graham crackers
- 5 tablespoons unsalted butter, melted
- 2 tablespoons granulated sugar
- 1 small box (3.4 oz) cheesecake pudding mix
- 1 ¼ cups cold milk
- 1 8-ounce container extra-creamy whipped topping, divided
- 4 ounces cream cheese, softened
- 12 Oreo cookies, finely crushed
- 3 Oreo cookies, crushed (for topping)
Instructions
-
1Begin by preparing the chocolate graham cracker crust. Preheat your oven to 350°F (175°C) to ensure it reaches the right temperature while you assemble the other ingredients.
-
2Break the chocolate graham crackers into pieces and place them in a food processor. Pulse until the crackers turn into uniform, fine crumbs. This ensures a consistent crust that will hold together well.
-
3Pour the melted unsalted butter and granulated sugar into the food processor with the crumbs. Pulse several times until the mixture looks like damp sand and starts to clump when pressed between your fingers. This texture is crucial for a sturdy pie base.
-
4Transfer the graham mixture into a 9-inch pie dish. Use the bottom of a measuring cup or clean hands to press the crumbs firmly and evenly across the bottom and slightly up the sides of the dish. Compacting the crust well will prevent it from crumbling after baking.
-
5Bake the chocolate graham crust in the preheated oven for 8 to 10 minutes. This brief baking period helps the crust set and brings out a deeper chocolate flavor. Remove from the oven and let it cool completely before adding the filling. Cooling is essential to avoid melting the cheesecake mixture later.
-
6As the crust cools, focus on the Oreo cheesecake filling. Place the softened cream cheese in a mixing bowl and beat it with a hand mixer on medium speed until it becomes completely smooth and lump-free. This step ensures a creamy, even base for the filling.
-
7Pour the cold milk into the bowl with the cream cheese, then sprinkle the cheesecake pudding mix over the top. Use an electric mixer to beat the mixture for 1 to 2 minutes, or until it thickens to a custard-like consistency. The pudding mix stabilizes the filling and imparts classic cheesecake flavor.
-
8Gently fold in 8 ounces of extra-creamy whipped topping and the 12 finely crushed Oreo cookies. Use a spatula and a light hand to combine, ensuring the filling remains fluffy and the cookies are evenly dispersed without deflating the mixture.
-
9Spoon the finished Oreo cheesecake filling into the completely cooled chocolate graham cracker crust. Use a spatula to spread the filling smoothly and evenly, creating an inviting surface for the toppings.
-
10Cover the pie and transfer it to the refrigerator. Allow it to chill for at least four hours, although refrigerating overnight yields the best texture and flavor as the filling fully sets.
-
11Before serving, spread the remaining 4 ounces of whipped topping over the chilled pie in an even layer. For a decorative and crunchy finish, sprinkle the top with the 3 crushed Oreo cookies.
-
12Use a sharp knife, dipped in hot water for clean slices, to portion the pie, and serve cold to enjoy the creamy texture and rich flavors at their best.
Approximate Information for One Serving
Nutrition Disclaimers
Number of total servings shown is approximate. Actual number of servings will depend on your preferred portion sizes.
Nutritional values shown are general guidelines and reflect information for 1 serving using the ingredients listed, not including any optional ingredients. Actual macros may vary slightly depending on specific brands and types of ingredients used.
To determine the weight of one serving, prepare the recipe as instructed. Weigh the finished recipe, then divide the weight of the finished recipe (not including the weight of the container the food is in) by the desired number of servings. Result will be the weight of one serving.
Did you make this recipe?
Please consider Pinning it!
Leave a Reply