Craving the nostalgic crunch of a Butterfinger bar but hoping for a healthier alternative? Healthy Homemade Butterfingers are here to satisfy your sweet tooth, offering all the irresistible layers and peanutty goodness you remember, but made with wholesome, real-food ingredients.
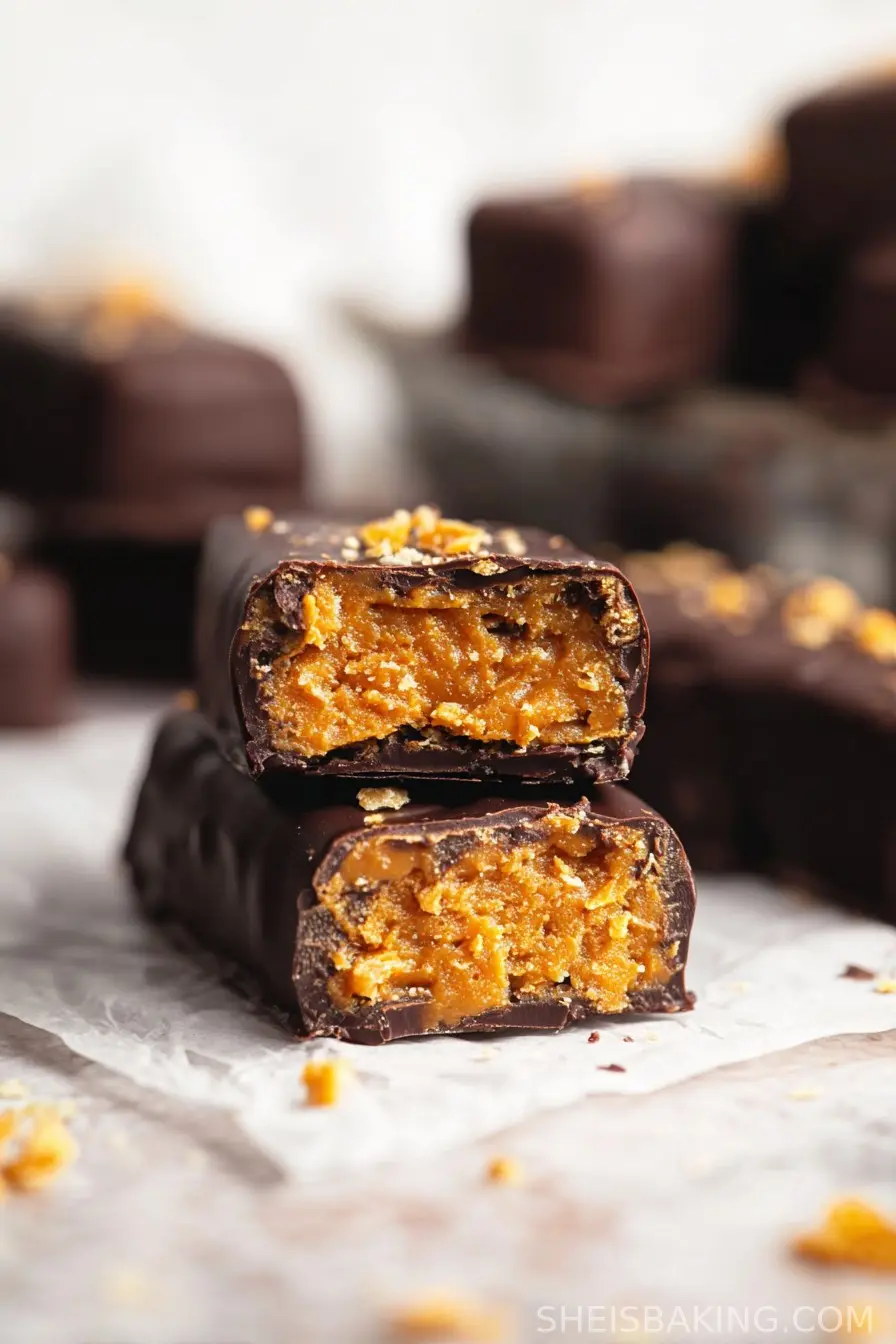
The original Butterfinger made its debut in 1923 and quickly became an American confectionery staple, best known for its crisp, flaky layers folded into sweet peanut butter and coated in a lush chocolate shell.
With a growing interest in nutritious snacking and mindful indulgence, more people are reinventing classic candy bars at home, swapping processed sugars and additives for natural sweeteners and protein-packed nuts.
This recipe for Healthy Homemade Butterfingers retains all the classic flavors and texture of the original candy bar but uses healthier substitutes like natural peanut butter, coconut flour, and a touch of maple syrup.
Perfect for satisfying midday cravings or sharing at celebrations, these homemade bars are a delightful way to enjoy a sweet treat without the guilt.
Whether you are vegan, gluten-free, or simply searching for easy, delicious snacks the whole family can enjoy, these Butterfinger-inspired bars are sure to become a favorite in your kitchen. Get ready to transform your snacking with this nutritious twist on a beloved classic.
Ingredients
- 1 cup natural peanut butter (smooth, no sugar added)
- ¼ cup maple syrup or honey
- ½ cup crushed cornflakes or brown rice cereal (gluten-free if desired)
- ¼ cup coconut flour
- ½ teaspoon pure vanilla extract
- ¼ teaspoon sea salt
- 1 ¼ cups dark chocolate chips or vegan chocolate chips
- 1 tablespoon coconut oil
Instructions
- Line an 8x8 inch baking pan with parchment paper for easy removal.
- In a medium mixing bowl, combine natural peanut butter and maple syrup (or honey). Stir until smooth and well incorporated.
- Add the vanilla extract and sea salt. Mix in the coconut flour gradually, stirring until a thick dough forms.
- Gently fold in the crushed cornflakes or brown rice cereal, ensuring the mixture becomes textured and slightly crumbly but holds together.
- Spread the peanut butter mixture evenly into the prepared pan, pressing down firmly to compact. Place in the freezer for 20-30 minutes until set.
- While the base chills, melt the dark chocolate chips and coconut oil together over a double boiler or in the microwave in 20-second intervals, stirring until smooth.
- Remove the set peanut butter base and cut into desired bar shapes or bite-sized pieces.
- Using two forks, dip each bar into the melted chocolate, ensuring all sides are coated. Allow excess chocolate to drip off and place the bars on a parchment-lined tray.
- Once all bars are coated, return them to the freezer for 15-20 minutes or until the chocolate is firm.
- Store Healthy Homemade Butterfingers in an airtight container in the refrigerator for up to 2 weeks or freeze for longer storage.
Nutritional Information
A serving of Healthy Homemade Butterfingers (approximate, based on one bar when the recipe yields 14 bars) delivers a satisfying balance of macronutrients and energy. Each bar contains around 180 calories, 12g fat (primarily from healthy unsaturated fats present in peanut butter and coconut oil), 15g carbohydrates, and 4g protein.
The recipe is naturally gluten-free (when using gluten-free cereal), and each bar is free from artificial additives or preservatives. Thanks to the use of dark chocolate, these bars supply antioxidants and less sugar than typical store-bought candy.
Natural peanut butter contributes protein, fiber, and essential vitamins, while coconut flour adds additional fiber without increasing blood sugar spikes. The inclusion of cornflakes or brown rice cereal gives a satisfying crunch with moderate carbohydrates for quick energy.
Overall, these bars are a smarter alternative to conventional candy, providing nutrients and a moderate calorie profile perfectly suited for a treat or post-workout snack.

Wine and Beverage Pairings
Healthy Homemade Butterfingers pair deliciously with both hot and cold beverages. For a comforting, dessert-like experience, enjoy them alongside a cup of dark roast coffee, a creamy cappuccino, or a soothing herbal tea such as rooibos or peppermint.
For something more indulgent, try a glass of cold almond or oat milk. If you're serving these bars for a gathering or celebration, a sweet dessert wine like Moscato or a light-bodied red such as Pinot Noir can balance the chocolate and peanut flavors.
For a non-alcoholic twist, a vanilla-infused chai latte will highlight the subtle spice and sweetness of the bars.
Cooking Tips and Variations
For the crispiest and most authentic Butterfinger-like crunch, ensure your cornflakes or brown rice cereal is finely crushed but not pulverized-this helps create the classic layered texture. If you prefer your bars vegan, substitute honey with pure maple syrup and ensure your dark chocolate is certified vegan.
For a nut-free alternative, use sunflower seed butter instead of peanut butter, and adjust the coconut flour as needed to achieve dough consistency.
Those looking for extra protein can mix in a scoop of unflavored or vanilla protein powder, though it may be necessary to slightly increase the syrup or nut butter to maintain the right texture.
For added flavor variation, try stirring in a teaspoon of orange zest or a pinch of cinnamon. When melting chocolate, be careful not to overheat, as burning will affect the flavor and texture. For a fun presentation, drizzle additional chocolate or sprinkle with flaky sea salt before the chocolate sets.
Lastly, always store the bars in a cool area to preserve their texture and flavor.

Serving Suggestions
Serve Healthy Homemade Butterfingers as a satisfying snack or dessert, ideal for holidays, lunchboxes, and parties. Arrange the bars on a decorative platter alongside fresh berries, dried fruit, or roasted nuts for a striking yet wholesome dessert tray.
For a special touch, cut the bars into mini squares and place them in colorful cupcake liners, making them easy to grab for potlucks or birthday celebrations.
These bars also make excellent gifts-pack them in a small tin or cellophane bag and secure with a ribbon for a personal, homemade present. If you seek a frozen treat, enjoy the bars straight from the freezer for a firmer texture and a delightful chilled crunch.
For those who like to elevate simple desserts, Healthy Homemade Butterfingers can be chopped and sprinkled over yogurt parfaits, oatmeal bowls, or banana ice cream. Whether shared with family or stored away for solo indulgence, these bars are sure to brighten any occasion with their rich flavor and satisfying texture.
Health Benefits
Healthy Homemade Butterfingers provide a nutritional upgrade from conventional candy bars, utilizing natural, minimally-processed ingredients. Natural peanut butter features protein and healthy monounsaturated fats, shown to support heart health and sustained energy.
Coconut flour adds dietary fiber, contributing to digestive health and satiety while maintaining a lower glycemic impact than refined flours. The inclusion of dark chocolate offers antioxidants, potentially beneficial for cardiovascular health, and reduces sugar load compared to milk chocolate.
Using maple syrup or honey ensures the sweetener is less processed and brings trace minerals alongside natural sweetness. For those with dietary restrictions, the recipe easily adapts to gluten-free, vegan, or nut-free versions, broadening its suitability.
By making candy at home, you can avoid excess sugars, preservatives, and artificial ingredients, supporting healthier snacking habits without compromising on taste or enjoyment.
Frequently Asked Questions
Absolutely! Simply use gluten-free cornflakes or brown rice cereal to ensure the bars are safe for those with gluten sensitivities.
Store the bars in an airtight container in the refrigerator for up to 2 weeks, or freeze for up to 3 months to keep them fresh.
Yes, almond or even sunflower seed butter can be substituted for a different nutty flavor or to accommodate nut allergies.
Yes, just use maple syrup instead of honey and choose dairy-free chocolate chips to make this treat fully vegan.
Reduce the amount of maple syrup or honey slightly, but make sure the mixture still holds together easily. Consider bittersweet chocolate for less sweetness.
Healthy Homemade Butterfingers are the perfect answer for anyone seeking a delicious candy bar experience with wholesome, thoughtfully chosen ingredients. Packed with natural peanut butter, fiber-rich coconut flour, and antioxidant-rich dark chocolate, these bars provide both amazing taste and a boost of nutrition. The easy-to-follow recipe invites customization, ensuring everyone can enjoy this classic treat in a healthier way. Serve them at gatherings, pack them into lunchboxes, or indulge guilt-free at home-the possibilities are endless. Whether you are a long-time Butterfinger fan or just discovering homemade candies, this recipe is sure to satisfy your cravings and brighten your day. Embrace the joys of mindful snacking with these irresistible, Healthy Homemade Butterfingers.
Ingredients
- 1 cup natural creamy peanut butter
- ⅓ cup pure maple syrup
- ½ cup coconut sugar
- 2 ½ cups cornflakes, crushed
- 1 teaspoon pure vanilla extract
- ¼ teaspoon sea salt
- 1 ¼ cups dark chocolate chips (dairy-free if desired)
- 2 teaspoons coconut oil
Instructions
-
1Line an 8x8-inch square baking pan with parchment paper, leaving some overhang for easy removal.
-
2In a medium saucepan over medium-low heat, combine peanut butter, maple syrup, and coconut sugar. Stir continuously until mixture is smooth and coconut sugar dissolves, about 3-4 minutes. Remove from heat.
-
3Stir in vanilla extract and sea salt. Gently fold in the crushed cornflakes until fully coated and evenly combined.
-
4Press the mixture firmly and evenly into the prepared pan. Place in the freezer for at least 20 minutes to set.
-
5Melt the dark chocolate chips and coconut oil in a microwave or double boiler until smooth. Remove the set bars from the pan and cut into 12 rectangles.
-
6Dip each bar into melted chocolate, ensuring all sides are coated. Place coated bars on a parchment-lined tray and chill in the refrigerator until chocolate sets, about 10 minutes. Enjoy!
Approximate Information for One Serving
Nutrition Disclaimers
Number of total servings shown is approximate. Actual number of servings will depend on your preferred portion sizes.
Nutritional values shown are general guidelines and reflect information for 1 serving using the ingredients listed, not including any optional ingredients. Actual macros may vary slightly depending on specific brands and types of ingredients used.
To determine the weight of one serving, prepare the recipe as instructed. Weigh the finished recipe, then divide the weight of the finished recipe (not including the weight of the container the food is in) by the desired number of servings. Result will be the weight of one serving.
Did you make this recipe?
Please consider Pinning it!!
Leave a Reply