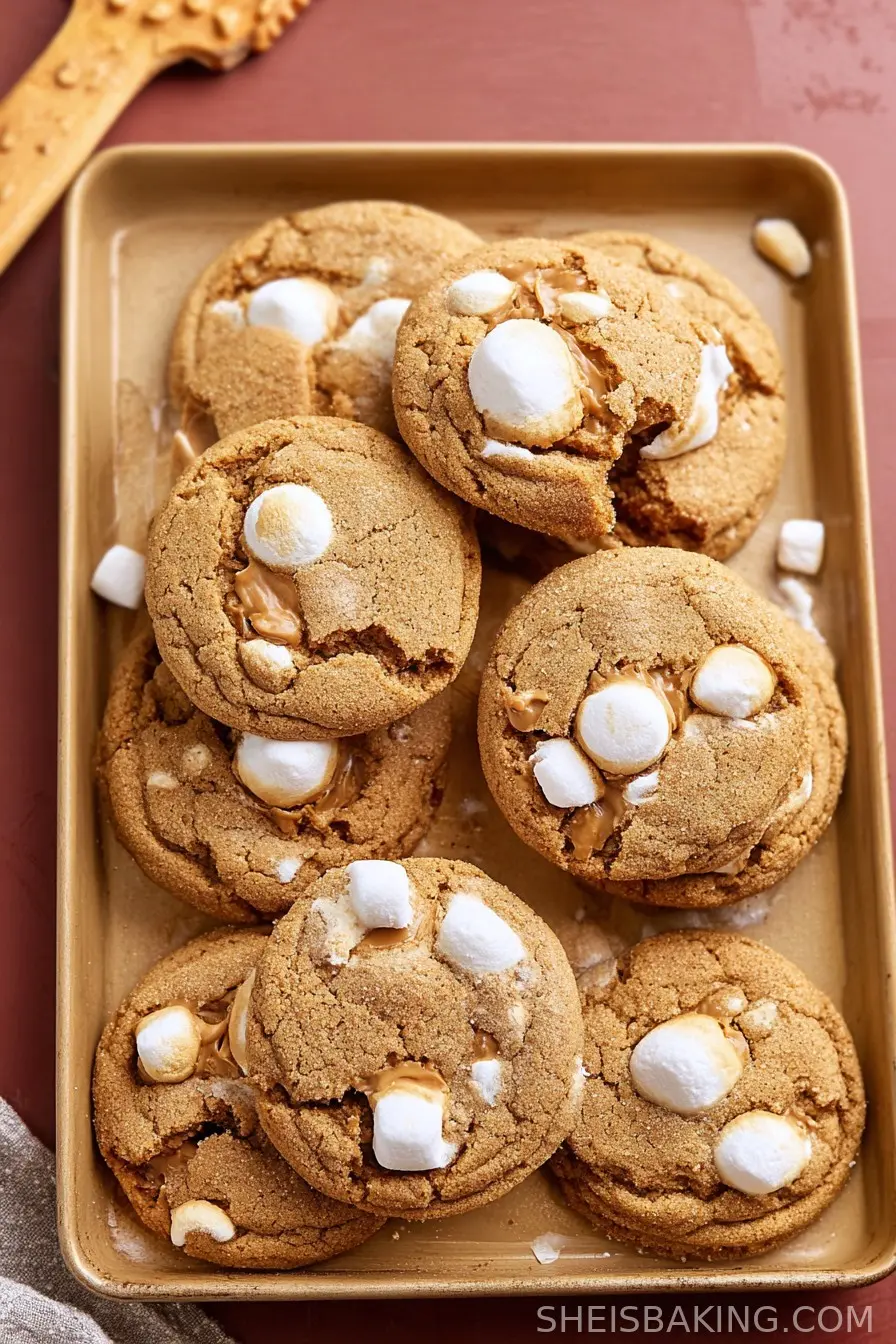
Gluten-Free Peanut Butter Marshmallow Cookies have quickly become a favorite treat among dessert lovers, and it's no surprise why. This delightful cookie brings together the rich, nutty essence of creamy peanut butter with the irresistible, gooey nature of mini marshmallows, all enveloped in a perfectly soft gluten-free cookie dough.
Historically, peanut butter cookies originated in the United States in the early 20th century, when George Washington Carver promoted the versatility of peanuts. Since then, peanut butter cookies have evolved and been reimagined in countless creative ways to suit every palate and dietary need.
Today, gluten-free baking has opened the door for even more people to enjoy classic flavors without the worry of gluten. By using gluten-free flour and simple substitutions, cookies like these Gluten-Free Peanut Butter Marshmallow Cookies let everyone indulge in familiar, homey flavors no matter their dietary restrictions.
The contrast of chewy, caramelized marshmallow pockets against a soft, peanutty base makes these cookies unforgettable. Whether you're adapting to a gluten-free lifestyle for health reasons or simply looking for an innovative new way to enjoy peanut butter cookies, this recipe provides a foolproof path to a delicious homemade treat.
With each bite, you'll experience the comforting nostalgia of traditional cookies and the excitement of a modern twist: the addition of gooey marshmallows. This ultimate fusion has made these cookies an instant classic for gatherings, lunchboxes, and snack times.
Explore this comprehensive, SEO-friendly guide and discover why Gluten-Free Peanut Butter Marshmallow Cookies are essential for any cookie enthusiast's repertoire.
Ingredients
- 1 ¼ Cup Gluten-Free Flour, you can also substitute all-purpose flour
- 1 Teaspoon Baking Soda
- ½ Teaspoon Sea Salt
- ½ Cup Butter, unsalted and softened
- ½ Cup Granulated Sugar
- ¾ Cup Brown Sugar, packed
- ¾ Cup Creamy Peanut Butter
- 1 Large Egg
- 2 Teaspoons Vanilla Extract
- 1 ¼ Cups Mini Marshmallows, frozen
Instructions
- Begin by focusing on the mini marshmallows. To ensure they hold their shape while baking and don't melt away completely, place the mini marshmallows in a tightly sealed container or freezer-safe bag and let them chill in the freezer for a minimum of 2-3 hours before you start mixing the cookie dough. This step is crucial for achieving gooey, not runny, marshmallow centers in every bite.
- Prepare for baking by preheating your oven to 350°F (175°C), which ensures consistent results and optimal cookie texture. Meanwhile, line a baking sheet with parchment paper to prevent sticking and make clean-up easier.
- In a medium mixing bowl, combine your gluten-free flour with baking soda and sea salt. Whisk these dry ingredients together thoroughly. Proper mixing at this stage helps distribute the leavening agent and salt evenly, setting the foundation for cookies that rise perfectly and deliver balanced flavor.
- In a separate, larger bowl, place the softened unsalted butter, granulated sugar, and packed brown sugar. Using a hand mixer, beat these together until the mixture is light in color and fluffy-this usually takes 1-2 minutes. Creaming the butter and sugars well is key for a soft yet sturdy cookie. Next, add the creamy peanut butter, one large egg, and vanilla extract to the bowl. Mix again until the wet ingredients are smoothly blended with no streaks remaining. Scraping down the sides of the bowl periodically ensures every ingredient is well incorporated.
- Take the mini marshmallows out of the freezer just before this stage so they stay as cold as possible. Quickly fold the frozen marshmallows into the wet mixture, using a spatula. The low temperature of the marshmallows helps them keep their form when baked and prevents them from dissolving into the dough.
- Gradually add the bowl of dry ingredients to the wet mixture. Mix with the hand mixer or by hand just until a thick, cohesive dough forms. Be careful not to overmix at this point to keep the cookies tender.
- Set the finished dough aside. Prepare your baking sheet by making sure the parchment paper covers all exposed areas so none of the marshmallow bits stick. Using a large cookie scoop (or a spoon if you don't have one), portion out generous balls of dough, about 2-3 tablespoons each. Place them on the baking sheet, leaving at least 1-2 inches between each ball to allow for spreading as they bake.
- Place the sheet of cookie dough balls into your preheated oven and bake for 10-11 minutes. Keep an eye on them near the end-look for lightly golden edges and a soft, slightly underbaked center, as the cookies will continue to cook after being removed from the oven.
- Once out of the oven, let the cookies cool directly on the sheet for about 10 minutes. This resting period allows them to set properly and makes them easy to transfer without breaking. The marshmallow and peanut butter components will settle further while cooling, giving you that chewy, gooey texture.
- Once cooled, move the cookies to a wire rack or serving plate. Enjoy them warm for ultimate gooeyness. Store any extra cookies in an airtight container in the fridge, where they'll keep fresh for up to a week, preserving their delightful texture.
Nutritional Information
With a wonderful combination of indulgence and satisfying textures, these Gluten-Free Peanut Butter Marshmallow Cookies are as delightful nutritionally as they are flavorful.
Each cookie provides a mix of macronutrients, with a moderate balance of carbohydrates from both the gluten-free flour and sugars, along with healthy fats from the peanut butter.
Peanut butter is a good source of unsaturated fats, protein, and important nutrients like vitamin E and magnesium, lending some wholesome aspects to these treats. While these cookies are meant as a sweet snack or dessert, enjoying them in moderation can fit into a balanced diet.
Each serving typically contains about 180-220 calories, depending on size and specific brands used, with roughly 8-10 grams of fat, 22-26 grams of carbohydrates, and around 3-4 grams of protein per cookie.
The use of gluten-free flour ensures that these cookies are accessible to those with celiac disease or gluten sensitivities, without sacrificing taste or consistency.
Keep in mind that while the sugars supply quick energy, pairing a cookie with a high-fiber meal or enjoying it as part of an active lifestyle helps minimize blood sugar spikes.
Freezing the marshmallows prior to baking also means that most of the sugars stay contained within chewy, molten pockets, rather than dissolving throughout the cookie, keeping the sweetness balanced.
As always, be mindful of portion sizes to benefit from the energy-boosting and satisfying flavors found in each bite, and remember that homemade treats often have a simpler ingredient list and fewer preservatives than store-bought cookies.
Wine and Beverage Pairings
To complement the rich, nutty, and sweet notes of Gluten-Free Peanut Butter Marshmallow Cookies, consider pairing them with a classic glass of cold milk-either dairy or a creamy plant-based alternative such as oat or almond milk.
The smoothness of milk offers a soothing contrast to the rich peanut butter and gooey marshmallow. For a warm treat, serve these cookies alongside a mug of hot cocoa, which enhances the nostalgic s'mores flavor, or a lightly roasted coffee to balance the sweetness with subtle bitterness.
Tea lovers might enjoy pairing these treats with a robust black tea or a gently spiced chai for a cozy afternoon delight. For adults seeking a sophisticated option, a glass of late-harvest Riesling or tawny port can bring out the dessert's caramel and peanut notes.
These beverage choices round out the flavor profile and make the cookie experience even more memorable.
Cooking Tips and Variations
Creating the perfect batch of Gluten-Free Peanut Butter Marshmallow Cookies is easy with a few expert pointers and customizable variations. First, always freeze the mini marshmallows thoroughly-this small task makes a big difference, preventing them from melting away entirely during baking and yielding gooey pockets throughout each cookie.
For the fluffiest results, make sure your butter is truly softened but not melted, as this ensures even creaming and a tender crumb.
When mixing your wet and dry ingredients, stop as soon as you see the dough come together to avoid overworking the gluten-free flour, which can result in dense cookies.
If you'd like a richer peanut flavor, opt for a natural, unsweetened creamy peanut butter-just make sure to stir it well before measuring.
For extra texture, you can fold in ½ cup of chopped roasted peanuts or swap in a portion of mini chocolate chips for a peanut butter s'mores-inspired variation. If you're accommodating other dietary needs, consider using a dairy-free butter substitute or flaxseed egg to make the cookies vegan.
To enhance presentation, top the dough balls with a few extra frozen marshmallows before baking. For easy portioning and fewer sticky hands, try using a silicone baking mat instead of parchment.
Lastly, always let the cookies cool fully on the baking sheet; this ensures the marshmallow centers don't ooze before they have set, giving you the perfect marshmallow-to-cookie ratio every time.

Serving Suggestions
Gluten-Free Peanut Butter Marshmallow Cookies are a wonderfully versatile treat that adapts to a wide range of serving occasions. For an irresistible presentation at parties or gatherings, arrange the cookies on a decorative platter or cake stand, highlighting their golden color and gooey marshmallow centers.
They're a top pick for gluten-free bake sales, school events, or afternoon snacks, as even those without dietary restrictions will love their chewy, sweet personality. Consider making these cookies part of a s'mores-inspired dessert platter with bowls of mini chocolate chips, fresh berries, and drizzled caramel or chocolate sauce.
At home, they're ideal for lunchboxes or after-school snacks, and can easily be packed individually in wax paper for potlucks or picnics. For an indulgent dessert, try sandwiching a scoop of vanilla ice cream between two cookies, rolling the edge in extra mini marshmallows or chopped peanuts.
Warm the cookies briefly in the microwave before serving to recreate that fresh-from-the-oven texture and maximize the gooey marshmallow experience. If you want a decorative touch, dust the finished cookies with a sprinkle of sea salt or drizzle them with melted chocolate.
The cookies keep well in an airtight container for up to a week, making them great for meal prepping desserts or preparing treats ahead of time for special occasions. No matter how you serve them, these cookies are sure to bring smiles and nostalgia to any table.
Health Benefits
Beyond their classic flavor, Gluten-Free Peanut Butter Marshmallow Cookies offer several health-oriented benefits that make them a smart choice for inclusive dessert tables.
Using gluten-free flour means these cookies are safe for those with celiac disease or gluten allergies, making it easier for everyone to partake in sweet moments without worry.
Peanut butter, the starring ingredient, is packed with protein, healthy fats, and fiber, which can contribute to satiety and a steady source of energy. It also contains important vitamins and minerals like B6, magnesium, and potassium.
While the cookies do include sugar and marshmallows, enjoying them in moderation as part of a balanced diet allows you to indulge your sweet tooth without overdoing it.
The recipe gives you control over portion size and the quality of ingredients, unlike many commercial cookies that may include additives or excess preservatives.
For those watching their salt or sugar intake, you can experiment with reducing either by a small amount while keeping the proportions of the main components intact.
Since these cookies deliver heartier protein and fat content than many other sweet treats, they help minimize sugar spikes and keep you feeling satisfied longer.
Whether you're baking for dietary needs or simply looking to enjoy a more wholesome homemade dessert, Gluten-Free Peanut Butter Marshmallow Cookies represent a delicious way to nourish both body and soul.
Frequently Asked Questions
Yes, you can substitute all-purpose flour if gluten sensitivity is not a concern for you or your guests. The recipe works well with both gluten-free and regular flour, but always check for consistency as slight adjustments may be needed.
Freezing the mini marshmallows ensures they maintain their shape and create gooey pockets within the cookie rather than melting completely into the dough. This step is essential for achieving the signature texture.
Place the cooled cookies in an airtight container and keep them in the refrigerator. They will remain fresh and chewy for up to one week. For longer storage, you can also freeze the baked cookies for up to 2 months.
Yes, use a dairy-free butter alternative and a vegan egg substitute such as a flaxseed egg. Be sure to check that your marshmallows are vegan if needed, as some contain gelatin.
Absolutely! Fold in up to ½ cup of mini chocolate chips or chopped nuts for added flavor, texture, and a fun variation. Adjust additions according to personal preference.
Gluten-Free Peanut Butter Marshmallow Cookies combine the best of nostalgic flavors and modern dietary needs, ensuring that everyone can enjoy a delicious, home-baked treat. With their chewy peanut butter base and voluptuous, gooey bits of marshmallow throughout, these cookies are sure to please both classic cookie fans and those seeking gluten-free options. The method is straightforward, making this recipe accessible even for beginner bakers, and with plenty of options for customization, you can tailor the cookies to suit your taste or occasion. Share these cookies at gatherings, gift them to friends, or simply enjoy them at home with your favorite beverage-their satisfying texture and balanced sweetness guarantee they'll be requested again and again. Experiment with creative add-ins and savor the fun, nostalgic twist of marshmallows in a time-honored peanut butter cookie. Bake up a batch today and join the growing number of fans of these irresistible Gluten-Free Peanut Butter Marshmallow Cookies.
Ingredients
- 1 ¼ Cup Gluten-Free Flour, you can also substitute all-purpose flour
- 1 Teaspoon Baking Soda
- ½ Teaspoon Sea Salt
- ½ Cup Butter, unsalted and softened
- ½ Cup Granulated Sugar
- ¾ Cup Brown Sugar, packed
- ¾ Cup Creamy Peanut Butter
- 1 Large Egg
- 2 Teaspoons Vanilla Extract
- 1 ¼ Cups Mini Marshmallows, frozen
Instructions
-
1Begin by focusing on the mini marshmallows. To ensure they hold their shape while baking and don't melt away completely, place the mini marshmallows in a tightly sealed container or freezer-safe bag and let them chill in the freezer for a minimum of 2-3 hours before you start mixing the cookie dough. This step is crucial for achieving gooey, not runny, marshmallow centers in every bite.
-
2Prepare for baking by preheating your oven to 350°F (175°C), which ensures consistent results and optimal cookie texture. Meanwhile, line a baking sheet with parchment paper to prevent sticking and make clean-up easier.
-
3In a medium mixing bowl, combine your gluten-free flour with baking soda and sea salt. Whisk these dry ingredients together thoroughly. Proper mixing at this stage helps distribute the leavening agent and salt evenly, setting the foundation for cookies that rise perfectly and deliver balanced flavor.
-
4In a separate, larger bowl, place the softened unsalted butter, granulated sugar, and packed brown sugar. Using a hand mixer, beat these together until the mixture is light in color and fluffy-this usually takes 1-2 minutes. Creaming the butter and sugars well is key for a soft yet sturdy cookie. Next, add the creamy peanut butter, one large egg, and vanilla extract to the bowl. Mix again until the wet ingredients are smoothly blended with no streaks remaining. Scraping down the sides of the bowl periodically ensures every ingredient is well incorporated.
-
5Take the mini marshmallows out of the freezer just before this stage so they stay as cold as possible. Quickly fold the frozen marshmallows into the wet mixture, using a spatula. The low temperature of the marshmallows helps them keep their form when baked and prevents them from dissolving into the dough.
-
6Gradually add the bowl of dry ingredients to the wet mixture. Mix with the hand mixer or by hand just until a thick, cohesive dough forms. Be careful not to overmix at this point to keep the cookies tender.
-
7Set the finished dough aside. Prepare your baking sheet by making sure the parchment paper covers all exposed areas so none of the marshmallow bits stick. Using a large cookie scoop (or a spoon if you don't have one), portion out generous balls of dough, about 2-3 tablespoons each. Place them on the baking sheet, leaving at least 1-2 inches between each ball to allow for spreading as they bake.
-
8Place the sheet of cookie dough balls into your preheated oven and bake for 10-11 minutes. Keep an eye on them near the end-look for lightly golden edges and a soft, slightly underbaked center, as the cookies will continue to cook after being removed from the oven.
-
9Once out of the oven, let the cookies cool directly on the sheet for about 10 minutes. This resting period allows them to set properly and makes them easy to transfer without breaking. The marshmallow and peanut butter components will settle further while cooling, giving you that chewy, gooey texture.
-
10Once cooled, move the cookies to a wire rack or serving plate. Enjoy them warm for ultimate gooeyness. Store any extra cookies in an airtight container in the fridge, where they'll keep fresh for up to a week, preserving their delightful texture.
Approximate Information for One Serving
Nutrition Disclaimers
Number of total servings shown is approximate. Actual number of servings will depend on your preferred portion sizes.
Nutritional values shown are general guidelines and reflect information for 1 serving using the ingredients listed, not including any optional ingredients. Actual macros may vary slightly depending on specific brands and types of ingredients used.
To determine the weight of one serving, prepare the recipe as instructed. Weigh the finished recipe, then divide the weight of the finished recipe (not including the weight of the container the food is in) by the desired number of servings. Result will be the weight of one serving.
Did you make this recipe?
Please consider Pinning it!
Leave a Reply