The iconic New York Style Sourdough Discard Bagels are a delightful blend of tradition and taste, combining old-world baking techniques with the resourceful use of sourdough starter discard.
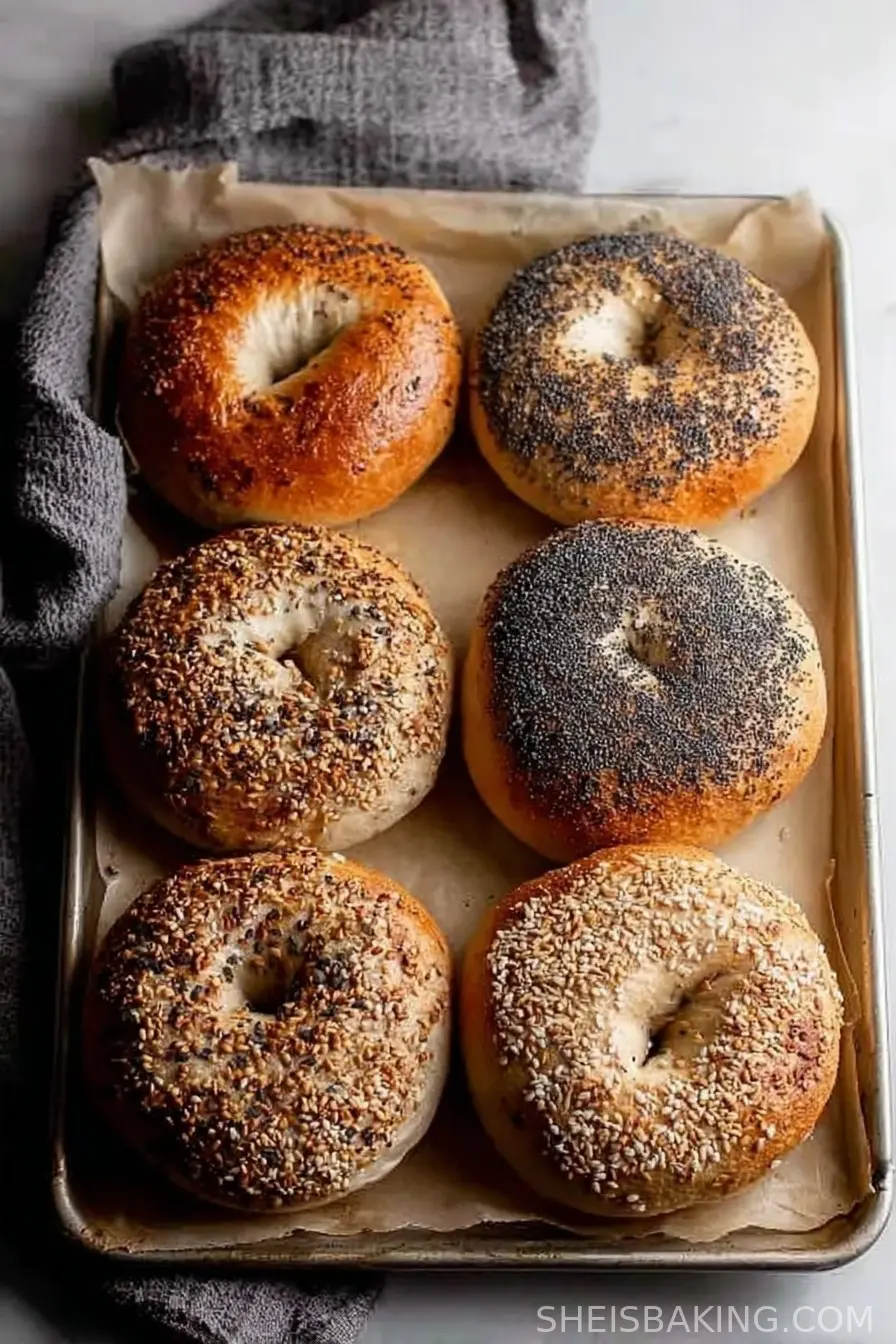
Previewed for their famously chewy texture, shiny golden crust, and malty flavor, New York bagels have been a breakfast staple in the city's vibrant culinary scene for decades.
This recipe gives bagel enthusiasts the chance to recreate that signature bakery-fresh experience right at home, utilizing Sourdough Discard to enhance both flavor and sustainability in your kitchen. Bagels originated in Poland during the 17th century and quickly gained popularity within Jewish communities for their unique boiled-and-baked preparation.
Immigrants brought their craft to New York City, where the tradition blossomed, leading to the recognizable, robust bagels we enjoy today.
The use of Sourdough Discard not only adds depth and complexity to the dough but also reduces kitchen waste-making this recipe perfect for home bakers keen on minimizing their footprint while maximizing flavor.
Crafting New York Style Sourdough Discard Bagels is as much about the process as it is about the taste.
From the initial mix and stretch-and-fold technique to the brief boiling in a honeyed baking soda bath and the application of your favorite toppings, each step is designed to ensure authentic texture and flavor.
Sourdough discard bridges the gap between tradition and modern kitchen practices, allowing you to savor every bite with a crisp crust and irresistibly chewy crumb.
Whether you're new to bagel baking or a seasoned sourdough pro, this comprehensive guide will walk you through every stage to create unforgettable, bakery-quality results in your own oven.
Ingredients
- 720 grams white bread flour (6 cups)
- 120 grams sourdough starter discard (1 cup)
- ½ teaspoon active or instant yeast
- 280 grams water (1 ¼ cups)
- 15 grams sea salt (about 2 teaspoons)
- 40 grams honey (about 2 tablespoons)
- 60 grams water, set aside (¼ cup)
- 1 tablespoon baking soda (for water bath)
- 1 tablespoon honey or sugar (for water bath)
- 2 tablespoons egg whites (for toppings)
- poppy seeds
- sesame seeds
- everything but the bagel
Instructions
- Before you begin, review notes on proofing time to plan your schedule, especially if you'd like to use the optional overnight cold fermentation for deeper flavor.
- In a spacious mixing bowl, combine the sourdough starter discard, active or instant yeast, bread flour, sea salt, honey, and 280 grams of water. If your dough feels dry or difficult to bring together, gradually work in the reserved 60 grams of water, a tablespoon at a time, until the mixture forms a rough, shaggy dough.
- Knead the combined ingredients either in the bowl or on a lightly floured surface for several minutes. Your goal is to develop a uniform dough, although it may still look a bit ragged. The dough should feel firm and slightly tacky but not sticky.
- Cover the mixing bowl with a plate or a damp kitchen towel to maintain moisture. Place the bowl in a warm area of your kitchen, allowing the dough to rise and develop for about one hour. This initial proofing activates the yeast and helps build flavor through fermentation.
- Next, perform a stretch-and-fold: Lightly moisten your hands and gently stretch the edge of the dough upward, folding it over the center. Rotate the bowl and repeat several times until the dough feels smoother and tighter. After shaping the dough back into a smooth ball, cover the bowl and let the dough proof again for 30 minutes in a warm environment.
- Dust your countertop lightly with flour to prevent sticking. Gently remove the dough from the bowl and place it on your prepared surface.
- Without deflating the dough, carefully stretch it into a rectangle just larger than a sheet of paper. Handle the dough gently to preserve the air bubbles and internal structure that contribute to a great bagel texture.
- Using a bench scraper or sharp knife, divide the dough into eight equal pieces-each should weigh approximately 160 grams for uniformly sized bagels.
- Line a baking sheet with parchment paper and sprinkle the surface with a little flour. As you shape each portion of dough in the next step, you'll place them here to prevent sticking.
- Shape each dough piece into a ball by gently folding the edges inwards and rolling it until smooth. Position each dough ball on the floured, parchment-lined baking sheet. Continue until all dough portions are formed.
- Lightly dust the tops of the dough balls with flour to avoid sticking during the second rise. Cover loosely with a towel and allow them to rise for about 30 minutes. The dough should visibly puff up, indicating proper fermentation.
- To shape the bagels, flour your hands and gently pick up a dough ball. Cradle it in your right hand and, using your thumb on top and your middle finger beneath, press through the center to create a hole. With your index and ring finger, support the circle, stretching and rotating the dough to form an even ring.
- Using your other hand, rotate the dough ring smoothly around the fingers of your right hand to develop a classic bagel shape with a pronounced central hole. This technique ensures even cooking and iconic appearance.
- Return each shaped bagel to the floured parchment paper, adding extra flour if needed to prevent sticking. Space the bagels to avoid crowding during the upcoming rest.
- Allow the formed bagels to rest for another 15 minutes, letting them become slightly puffed but still structured. Take care not to overproof at this stage to prevent deflation.
- For maximum flavor development, you can place the tray of shaped bagels in the refrigerator and let them ferment for up to 12 hours. This overnight step is optional but highly recommended for the best New York flavor and al dente texture.
- Preheat your oven to 450 degrees Fahrenheit (232 degrees Celsius) so it's ready for baking when the bagels finish boiling.
- Prepare your chosen toppings and distribute them into small bowls for easy access. This step saves time during the finishing process.
- Bring a large pot of water to a rolling boil. Stir in the baking soda and honey (or sugar), which will give your bagels their glossy, caramel-hued crust and help them rise rapidly during baking.
- Using a slotted spoon, gently lower each bagel into the boiling water. Boil for about one minute, flipping halfway through to ensure even surface cooking. This key step locks in moisture and produces the signature chewy bagel crust.
- Remove the boiled bagels with the slotted spoon and return them to the parchment-lined baking sheet to prepare for toppings.
- Brush the tops of each bagel with egg whites, ensuring a light but even coat to help the seeds stick and to enhance the bagels' shiny finish.
- Generously sprinkle your preferred toppings-poppy seeds, sesame seeds, or everything but the bagel seasoning-over the egg-washed bagels.
- Repeat the boiling, brushing, and topping steps for the remaining bagels. Once all are dressed, arrange them in the oven with some space between each.
- Bake the bagels for about 20 minutes in total, rotating the tray halfway through to ensure consistent coloring. The bagels should emerge deeply golden and sound hollow when tapped.
- Once baked, transfer the bagels to a cooling rack and allow them to cool for at least 30 minutes to finish developing their chewy crumb.
Nutritional Information
New York Style Sourdough Discard Bagels are not only a treat for the palate but also provide a satisfying source of energy and nutrients. Each bagel made from this recipe contains a blend of complex carbohydrates and proteins due to the use of high-protein bread flour and enriched sourdough discard.
The addition of sourdough not only imparts a nuanced tang but also contributes beneficial prebiotics and helps break down gluten, making the bagels easier to digest for some individuals.
With a moderate amount of sea salt and honey, these bagels are well-balanced in sodium and sugars-ideal for breakfast, brunch, or snacking. On average, a single bagel contains approximately 280 to 320 calories, providing a substantial amount for a meal or post-workout replenishment.
Each serving offers roughly 10-12 grams of protein, thanks to the bread flour and egg white toppings, alongside a wholesome quantity of dietary fiber. Fat content remains minimal, mostly derived from the egg white glaze and seeds; thus, these bagels fit comfortably into a health-conscious diet when consumed in moderation.
The poppy, sesame, and 'everything' toppings also add micronutrients like iron, magnesium, and healthy fats, supporting overall wellness. Since the recipe does not use butter or oil in the dough, saturated fat is kept low.
However, if toppings or spreads such as cream cheese or smoked salmon are added, nutritional values will vary. For those concerned about sugar intake, the honey acts as a natural sweetener for taste and browning, but you can moderate its portion in the recipe to suit dietary needs.
Always assess portion sizes and pair your bagels with balanced accompaniments for optimal nutrition.
Wine and Beverage Pairings
Bagels naturally pair with a range of beverages, both comforting and sophisticated. For breakfast, a strong, freshly brewed coffee or an intense espresso highlights the sourdough's tang, while black or herbal teas offer a mellow complement.
For a classic New York brunch vibe, serve with a crisp, slightly acidic sparkling white wine or a dry Prosecco, which cuts through the bagel's richness and complements smoked fish if used as a topping.
If you prefer non-alcoholic options, a glass of cold, lightly sweetened iced tea or a fresh citrus juice balances the dough's hearty flavors perfectly.
Cooking Tips and Variations
Achieving perfect New York Style Sourdough Discard Bagels requires patience and attention to detail. First, use bread flour for its high protein content, which is crucial for forming the distinct chewy structure that sets New York bagels apart.
Don't rush the fermentation stages; letting the dough rest and proof for the recommended times, or even choosing the optional overnight cold proof, will result in improved flavor complexity and a more developed crumb. Water temperature matters: use lukewarm water to activate instant yeast without overheating.
When performing the stretch-and-fold, avoid tearing the dough by keeping your fingers wet and using a gentle touch-this helps maintain the gluten network and produces a smoother surface. For the most authentic crust, ensure the water bath is at a full, rolling boil and contains both baking soda and sweetener.
An even egg white wash before seeding results in a shiny, crisp finish. Experiment with toppings to customize your bagels. While poppy and sesame seeds are classics, try adding garlic flakes, chopped onions, or a light dusting of flaky salt for unique twists.
Should you wish for denser bagels, shorten the final rise. For lighter bagels, extend proofing times slightly and be extra gentle during shaping. Always cool bagels fully before slicing to preserve their chewy interior. Finally, bagels freeze well: simply slice and freeze individually to enjoy fresh-baked flavor any day.

Serving Suggestions
New York Style Sourdough Discard Bagels are best enjoyed fresh and slightly warm, celebrating their golden crust and soft, chewy interior. To serve traditionally, slice your bagels horizontally and toast them lightly to add crunch and revive their just-baked aroma.
Classic toppings include cream cheese, lox, tomato, and thinly sliced red onion, creating a savory and satisfying open-faced sandwich. For breakfast or brunch, offer a spread of various cream cheeses-plain, herb, and chive-alongside dishes of capers, cucumbers, and smoked salmon for an interactive, deli-style experience.
For a sweet twist, pair your fresh bagels with butter, fruit preserves, or a sumptuous honey drizzle. Bagels also make an excellent foundation for hearty breakfast sandwiches: simply add scrambled eggs, crisp bacon, or avocado slices for a protein-packed start to your day.
When serving at a gathering, cut bagels into quarters and provide an assortment so guests can sample various flavors and toppings. Tip: Let the bagels cool for at least 30 minutes after baking, as this preserves the ideal crumb structure and makes slicing easier and safer.
Whether you enjoy them plain, toasted, or loaded with your favorite accompaniments, New York Style Sourdough Discard Bagels bring the nostalgic spirit of a New York bakery to your table. Their flexibility allows them to star at breakfast, lunch, or as an anytime snack.
Store leftovers in a paper bag at room temperature for up to two days, or freeze for longer keeping-simply toast from frozen for a bakery-fresh result.
Health Benefits
Including sourdough discard in your homemade bagels not only reduces food waste but also adds nutritional depth to your baking.
Sourdough fermentation enhances the bioavailability of minerals such as iron and magnesium, while naturally lowering the gluten content through enzymatic breakdown, making sourdough-based bagels potentially easier to digest for some individuals.
The slow proofing and fermentation process may also result in a lower glycemic index bite compared to bagels produced strictly with commercial yeast, aiding in more stable blood sugar levels and longer-lasting satiety.
Moreover, the careful use of sea salt and minimal added sugar make these bagels a better alternative to commercially produced varieties, which are often high in preservatives and unnecessary additives. The sesame and poppy seeds contribute healthy fats, fiber, and antioxidants, while egg whites provide additional protein with minimal fat.
This balance of carbohydrates, protein, and micronutrients makes sourdough discard bagels a nutritious choice in moderation. Remember, as with all baked goods, portion control is key. Pairing your bagel with protein-rich spreads or vegetables can further boost the health benefits.
Frequently Asked Questions
While this recipe uses a combination of sourdough discard and a small amount of instant yeast for reliability and consistent rise, you can omit yeast for a purely wild-fermented bagel. Extend the proofing process to allow the natural cultures to leaven the dough, but expect longer rise times and slight variations in texture.
Properly proofed bagels should look puffy and spring back slightly when gently pressed. Overproofed bagels will collapse or become too airy, while underproofed dough feels dense and tight. Use visual and tactile cues, and if you opt for an overnight fridge rise, always bake directly from cold for best results.
Absolutely. Once cooled, slice the bagels, place them in an airtight container or freezer bag, and freeze for up to three months. Reheat by toasting directly from frozen to restore flavor and texture.
Yes, after shaping the bagels, place them on a prepared tray, cover, and refrigerate overnight. The next morning, boil and bake straight from the fridge for fresh, warm bagels perfect for breakfast.
Bread flour is essential for achieving the classic chewy structure of New York bagels, due to its high protein content. All-purpose flour can be used in a pinch, but the bagels may turn out softer and less chewy.
New York Style Sourdough Discard Bagels are the epitome of artisanal home baking, combining classic technique with modern sustainability. This comprehensive guide walks you through every critical stage-from mixing and kneading up to shaping, boiling, and baking-ensuring scrumptious, golden bagels any New Yorker would approve of. Incorporating sourdough discard not only enriches the taste and texture but also supports a more eco-friendly kitchen. Whether you enjoy them classic with seeds or experiment with inventive toppings, these bagels promise an authentic, chewy-crusted experience sure to become a household favorite. With patience and attention to detail, you'll achieve professional-quality bagels and savor the pride of a true homemade staple.
Ingredients
- 720 grams white bread flour (6 cups)
- 120 grams sourdough starter discard (1 cup)
- ½ teaspoon active or instant yeast
- 280 grams water (1 ¼ cups)
- 15 grams sea salt (about 2 teaspoons)
- 40 grams honey (about 2 tablespoons)
- 60 grams water, set aside (¼ cup)
- 1 tablespoon baking soda (for water bath)
- 1 tablespoon honey or sugar (for water bath)
- 2 tablespoons egg whites (for toppings)
- poppy seeds
- sesame seeds
- everything but the bagel
Instructions
-
1Before you begin, review notes on proofing time to plan your schedule, especially if you'd like to use the optional overnight cold fermentation for deeper flavor.
-
2In a spacious mixing bowl, combine the sourdough starter discard, active or instant yeast, bread flour, sea salt, honey, and 280 grams of water. If your dough feels dry or difficult to bring together, gradually work in the reserved 60 grams of water, a tablespoon at a time, until the mixture forms a rough, shaggy dough.
-
3Knead the combined ingredients either in the bowl or on a lightly floured surface for several minutes. Your goal is to develop a uniform dough, although it may still look a bit ragged. The dough should feel firm and slightly tacky but not sticky.
-
4Cover the mixing bowl with a plate or a damp kitchen towel to maintain moisture. Place the bowl in a warm area of your kitchen, allowing the dough to rise and develop for about one hour. This initial proofing activates the yeast and helps build flavor through fermentation.
-
5Next, perform a stretch-and-fold: Lightly moisten your hands and gently stretch the edge of the dough upward, folding it over the center. Rotate the bowl and repeat several times until the dough feels smoother and tighter. After shaping the dough back into a smooth ball, cover the bowl and let the dough proof again for 30 minutes in a warm environment.
-
6Dust your countertop lightly with flour to prevent sticking. Gently remove the dough from the bowl and place it on your prepared surface.
-
7Without deflating the dough, carefully stretch it into a rectangle just larger than a sheet of paper. Handle the dough gently to preserve the air bubbles and internal structure that contribute to a great bagel texture.
-
8Using a bench scraper or sharp knife, divide the dough into eight equal pieces-each should weigh approximately 160 grams for uniformly sized bagels.
-
9Line a baking sheet with parchment paper and sprinkle the surface with a little flour. As you shape each portion of dough in the next step, you'll place them here to prevent sticking.
-
10Shape each dough piece into a ball by gently folding the edges inwards and rolling it until smooth. Position each dough ball on the floured, parchment-lined baking sheet. Continue until all dough portions are formed.
-
11Lightly dust the tops of the dough balls with flour to avoid sticking during the second rise. Cover loosely with a towel and allow them to rise for about 30 minutes. The dough should visibly puff up, indicating proper fermentation.
-
12To shape the bagels, flour your hands and gently pick up a dough ball. Cradle it in your right hand and, using your thumb on top and your middle finger beneath, press through the center to create a hole. With your index and ring finger, support the circle, stretching and rotating the dough to form an even ring.
-
13Using your other hand, rotate the dough ring smoothly around the fingers of your right hand to develop a classic bagel shape with a pronounced central hole. This technique ensures even cooking and iconic appearance.
-
14Return each shaped bagel to the floured parchment paper, adding extra flour if needed to prevent sticking. Space the bagels to avoid crowding during the upcoming rest.
-
15Allow the formed bagels to rest for another 15 minutes, letting them become slightly puffed but still structured. Take care not to overproof at this stage to prevent deflation.
-
16For maximum flavor development, you can place the tray of shaped bagels in the refrigerator and let them ferment for up to 12 hours. This overnight step is optional but highly recommended for the best New York flavor and al dente texture.
-
17Preheat your oven to 450 degrees Fahrenheit (232 degrees Celsius) so it's ready for baking when the bagels finish boiling.
-
18Prepare your chosen toppings and distribute them into small bowls for easy access. This step saves time during the finishing process.
-
19Bring a large pot of water to a rolling boil. Stir in the baking soda and honey (or sugar), which will give your bagels their glossy, caramel-hued crust and help them rise rapidly during baking.
-
20Using a slotted spoon, gently lower each bagel into the boiling water. Boil for about one minute, flipping halfway through to ensure even surface cooking. This key step locks in moisture and produces the signature chewy bagel crust.
-
21Remove the boiled bagels with the slotted spoon and return them to the parchment-lined baking sheet to prepare for toppings.
-
22Brush the tops of each bagel with egg whites, ensuring a light but even coat to help the seeds stick and to enhance the bagels' shiny finish.
-
23Generously sprinkle your preferred toppings-poppy seeds, sesame seeds, or everything but the bagel seasoning-over the egg-washed bagels.
-
24Repeat the boiling, brushing, and topping steps for the remaining bagels. Once all are dressed, arrange them in the oven with some space between each.
-
25Bake the bagels for about 20 minutes in total, rotating the tray halfway through to ensure consistent coloring. The bagels should emerge deeply golden and sound hollow when tapped.
-
26Once baked, transfer the bagels to a cooling rack and allow them to cool for at least 30 minutes to finish developing their chewy crumb.
Approximate Information for One Serving
Nutrition Disclaimers
Number of total servings shown is approximate. Actual number of servings will depend on your preferred portion sizes.
Nutritional values shown are general guidelines and reflect information for 1 serving using the ingredients listed, not including any optional ingredients. Actual macros may vary slightly depending on specific brands and types of ingredients used.
To determine the weight of one serving, prepare the recipe as instructed. Weigh the finished recipe, then divide the weight of the finished recipe (not including the weight of the container the food is in) by the desired number of servings. Result will be the weight of one serving.
Did you make this recipe?
Please consider Pinning it!

Leave a Reply