If you are searching for an indulgent dessert that combines the classic taste of Oreos with the creaminess of cheesecake, look no further than the No Bake Oreo Cheesecake Recipe.
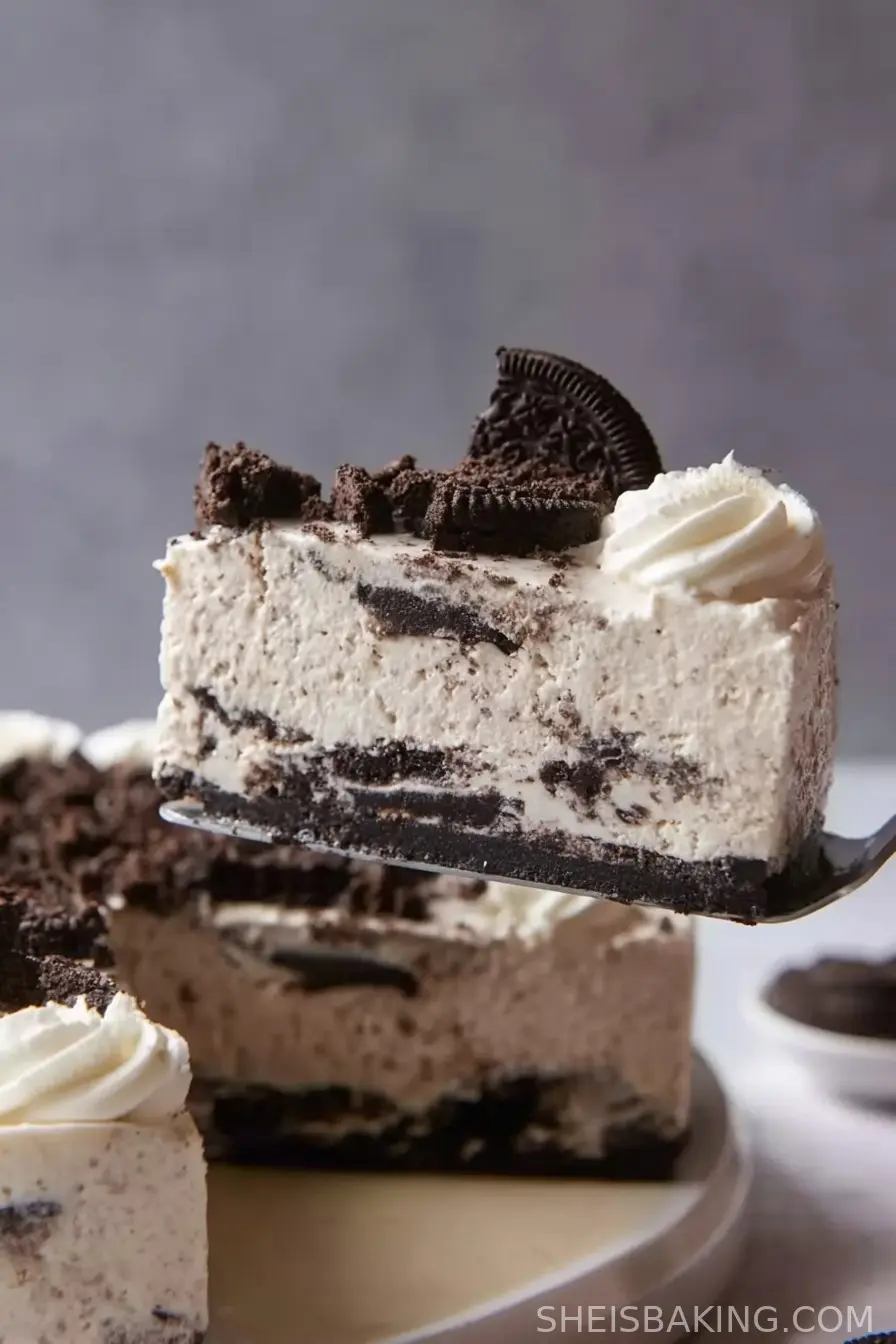
This delightful treat is one of the most beloved no bake cheesecake variants, offering a fuss-free method to enjoy all the richness of a traditional baked cheesecake without ever turning on your oven.
With its origins tied to the popularization of no bake desserts in American kitchens during the 20th century, the no bake Oreo Cheesecake quickly became a family favorite.
Its simple preparation and universally appealing ingredients ensure it's a hit for birthdays, holidays, family gatherings, or just when you need something sweet and decadent.
As Oreos have long been a staple in American pantries, transforming these chocolate sandwich cookies into a luscious cheesecake crust and creamy filling was an inevitable and inspired step.
Today, No Bake Oreo Cheesecake Recipe stands out for its versatility, ease, and nostalgic flavors, merging cookies and cheesecake into a dessert that's as fun to make as it is to serve.
Whether you're a novice or a seasoned home baker, this recipe will have everyone clamoring for seconds and asking for your secret.
Ingredients
- 24 Oreo cookies (plus 4-6 extra for garnish)
- ¼ cup (60 g) unsalted butter, melted
- 16 oz (450 g) cream cheese, softened
- 1 cup (120 g) powdered sugar
- 1 teaspoon pure vanilla extract
- 2 cups (480 ml) heavy whipping cream, cold
- Pinch of salt
Instructions
- Begin by preparing the crust. Crush 24 Oreo cookies into fine crumbs using a food processor or by placing them in a zip-top bag and crushing with a rolling pin.
- In a bowl, combine the Oreo crumbs with the melted butter. Mix thoroughly until the crumbs are evenly moistened.
- Press the Oreo-butter mixture firmly into the bottom of a 9-inch (23 cm) springform pan. Pack it tight using the bottom of a glass or measuring cup. Refrigerate the crust while making the filling.
- In a large mixing bowl, beat the softened cream cheese with powdered sugar, vanilla extract, and a pinch of salt until smooth and creamy.
- In a separate bowl, whip the cold heavy whipping cream to stiff peaks using a hand mixer or stand mixer.
- Gently fold the whipped cream into the cream cheese mixture in two batches, being careful not to deflate the whipped cream.
- Roughly chop 8 Oreo cookies and gently fold them into the filling for extra Oreo crunch and flavor.
- Pour the cheesecake filling over the chilled Oreo crust, smoothing the top with a spatula.
- Cover the pan with plastic wrap and refrigerate for at least 6 hours, preferably overnight, to allow the cheesecake to set and develop its flavor.
- Before serving, garnish with the reserved crushed or halved Oreos. For a professional touch, pipe extra whipped cream around the edges and top with more Oreo pieces.
- Run a thin knife around the edge of the pan to loosen the cheesecake before releasing the springform sides.
- Slice and serve chilled. Enjoy your homemade No Bake Oreo Cheesecake.
Nutritional Information
No Bake Oreo Cheesecake is a decadent treat designed for indulgence. Each slice (approximately 1/12th of the cheesecake) contains an estimated 410-450 calories, making it a rich dessert choice. The main sources of calories are cream cheese, heavy cream, and Oreo cookies.
Expect about 29-32 grams of fat per serving, with saturated fats from dairy products making up a significant portion. Protein levels are moderate at roughly 4-6 grams due to the cream cheese. Sugar content is relatively high, around 24-28 grams per slice, primarily from the cookies and powdered sugar.
This dessert is high in carbohydrates, with about 40-44 grams per serving, mainly from the Oreos and sweetened cream mixture. The sodium content can be notable due to both processed cookies and cream cheese.
While not designed as a low-calorie or health-focused dessert, the No Bake Oreo Cheesecake Recipe provides a satisfying treat in well-sized portions. Enjoying it on special occasions or as part of a balanced diet can help you indulge in its creamy, chocolaty flavor without overindulging.
You can slightly adjust ingredient quantities if you wish to manage the calorie and fat content. Modifying the base to use reduced-fat cream cheese or a lighter whipped topping can also help lower the total calorie count.

Wine and Beverage Pairings
Rich and creamy desserts like the No Bake Oreo Cheesecake pair beautifully with both coffee-based drinks and dessert wines. An espresso or a cappuccino cuts through the sweetness with welcome bitterness, enhancing the chocolate notes from the Oreos.
For a more decadent pairing, try a chilled glass of Baileys Irish Cream or a Kahlúa-based cocktail. If you prefer wine, a late-harvest Riesling, Moscato d'Asti, or a ruby port will complement the rich, creamy filling with their sweetness and fruitiness.
For a non-alcoholic option, chocolate milk or a vanilla malted milkshake echoes the flavors in the cheesecake and creates a nostalgic treat. Iced cold brew coffee also makes a refreshing pairing, counterbalancing the dessert's richness.
Cooking Tips and Variations
For the best No Bake Oreo Cheesecake Recipe, make sure your cream cheese is at room temperature before mixing to prevent lumps in the filling. Using full-fat cream cheese and real heavy whipping cream gives the smoothest, most luxurious texture.
To crush the Oreos efficiently, a food processor works best, but a rolling pin and zip-top bag will suffice if you don't have one. When pressing the crust into the pan, ensure it's packed tightly to prevent crumbling when slicing.
Allow the cheesecake to chill for a minimum of six hours, but overnight is ideal for a firmer, more cohesive texture and deeper flavor. For easier removal, line the bottom of your pan with parchment paper.
Additions such as a layer of chocolate ganache over the crust, or swirls of caramel before setting, provide creative twists. For a lighter version, you can substitute Greek yogurt for part of the cream cheese or use reduced-fat options.
Customize with flavored Oreos, such as mint or peanut butter, to match different taste preferences. Mini cheesecakes made in cupcake liners offer individual servings perfect for parties or gatherings.

Serving Suggestions
Serving No Bake Oreo Cheesecake Recipe is all about presentation and convenience. After chilling, use a sharp, hot knife (dipped in hot water and wiped clean between cuts) to slice through the creamy layers without dragging crumbs.
Transfer each slice to plates and garnish with extra Oreo pieces or a swirl of freshly whipped cream for an elegant touch. Serving with a drizzle of chocolate or caramel sauce adds both visual and flavor appeal.
For special occasions, top the cheesecake with chocolate curls, sprinkles, or even edible gold leaf. Making mini versions in individual ramekins or cupcake liners offers a perfect portion-controlled dessert for parties.
This recipe also lends itself to customization: layer with additional cookie crumbs, alternate cookie flavors, or serve with fresh berries for a pop of color and tartness. For summer events, the cold, creamy cheesecake is a refreshing finale to a barbecue or picnic.
Be sure to keep the cheesecake refrigerated until ready to serve, especially in warm conditions, to maintain its stable texture and creamy consistency.
Health Benefits
While the No Bake Oreo Cheesecake Recipe is designed to be a treat rather than a health food, it can have a place in a balanced lifestyle when enjoyed in moderation.
The main health concerns stem from its high sugar and saturated fat content, reflective of the cheese and cream used in the filling and the sugar in both the cookies and the crust. However, the recipe does provide some protein and calcium thanks to the cream cheese and dairy ingredients.
If you are looking to make a lighter version, consider using reduced-fat or Neufchâtel cream cheese, swap the heavy cream for a Greek yogurt-based alternative, or use a sugar substitute to lower the overall sugar content.
For those with special dietary needs, gluten-free Oreo-style cookies are now available, making this a more inclusive dessert. Although not an everyday dish, sharing this cheesecake as part of a celebration encourages mindful enjoyment and the joy of dessert as a communal experience.
Frequently Asked Questions
Absolutely! In fact, this dessert is best made at least 6 hours ahead or overnight to allow it to firm up and develop full flavor. Keep it refrigerated until ready to serve.
Yes, you can freeze it. Wrap it tightly in plastic wrap and then foil for up to one month. Thaw in the refrigerator for a few hours or overnight before slicing and serving.
A springform pan is recommended for easy removal and clean presentation, but you can also use a regular round cake pan lined with parchment paper for easier lifting out.
Definitely! The recipe works with all Oreo varieties, giving you countless flavor options such as mint, peanut butter, or birthday cake.
You can substitute whipped topping or lightly sweetened Greek yogurt for a lighter version, though texture and flavor may vary slightly from the classic version.
This No Bake Oreo Cheesecake Recipe perfectly showcases the irresistible combination of Oreos and creamy cheesecake. Its simplicity, requiring no oven and minimal hands-on time, makes it accessible for beginners while delighting even the most seasoned dessert lovers. Whether for a celebration, family event, or a self-indulgent treat, this cheesecake delivers on both taste and presentation. The customizable options ensure you can tailor it to any preference or dietary need, making it a versatile addition to your dessert repertoire. Enjoy preparing, serving, and most importantly, indulging in this classic American no bake favorite.
Ingredients
- 24 Oreo cookies (plus 4-6 extra for garnish)
- ¼ cup (60 g) unsalted butter, melted
- 16 oz (450 g) cream cheese, softened
- 1 cup (120 g) powdered sugar
- 1 teaspoon pure vanilla extract
- 2 cups (480 ml) heavy whipping cream, cold
- Pinch of salt
Instructions
-
1Begin by preparing the crust. Crush 24 Oreo cookies into fine crumbs using a food processor or by placing them in a zip-top bag and crushing with a rolling pin.
-
2In a bowl, combine the Oreo crumbs with the melted butter. Mix thoroughly until the crumbs are evenly moistened.
-
3Press the Oreo-butter mixture firmly into the bottom of a 9-inch (23 cm) springform pan. Pack it tight using the bottom of a glass or measuring cup. Refrigerate the crust while making the filling.
-
4In a large mixing bowl, beat the softened cream cheese with powdered sugar, vanilla extract, and a pinch of salt until smooth and creamy.
-
5In a separate bowl, whip the cold heavy whipping cream to stiff peaks using a hand mixer or stand mixer.
-
6Gently fold the whipped cream into the cream cheese mixture in two batches, being careful not to deflate the whipped cream.
-
7Roughly chop 8 Oreo cookies and gently fold them into the filling for extra Oreo crunch and flavor.
-
8Pour the cheesecake filling over the chilled Oreo crust, smoothing the top with a spatula.
-
9Cover the pan with plastic wrap and refrigerate for at least 6 hours, preferably overnight, to allow the cheesecake to set and develop its flavor.
-
10Before serving, garnish with the reserved crushed or halved Oreos. For a professional touch, pipe extra whipped cream around the edges and top with more Oreo pieces.
-
11Run a thin knife around the edge of the pan to loosen the cheesecake before releasing the springform sides.
-
12Slice and serve chilled. Enjoy your homemade No Bake Oreo Cheesecake.
Approximate Information for One Serving
Nutrition Disclaimers
Number of total servings shown is approximate. Actual number of servings will depend on your preferred portion sizes.
Nutritional values shown are general guidelines and reflect information for 1 serving using the ingredients listed, not including any optional ingredients. Actual macros may vary slightly depending on specific brands and types of ingredients used.
To determine the weight of one serving, prepare the recipe as instructed. Weigh the finished recipe, then divide the weight of the finished recipe (not including the weight of the container the food is in) by the desired number of servings. Result will be the weight of one serving.
Did you make this recipe?
Please consider Pinning it!

Leave a Reply