If you love the warm aroma and unbeatable texture of fresh-baked bagels, then there's nothing quite as delightful as an authentic Montreal Style Bagel Recipe. Montreal bagels are world-famous for their golden crust, slightly sweet flavor, and uniquely chewy bite.
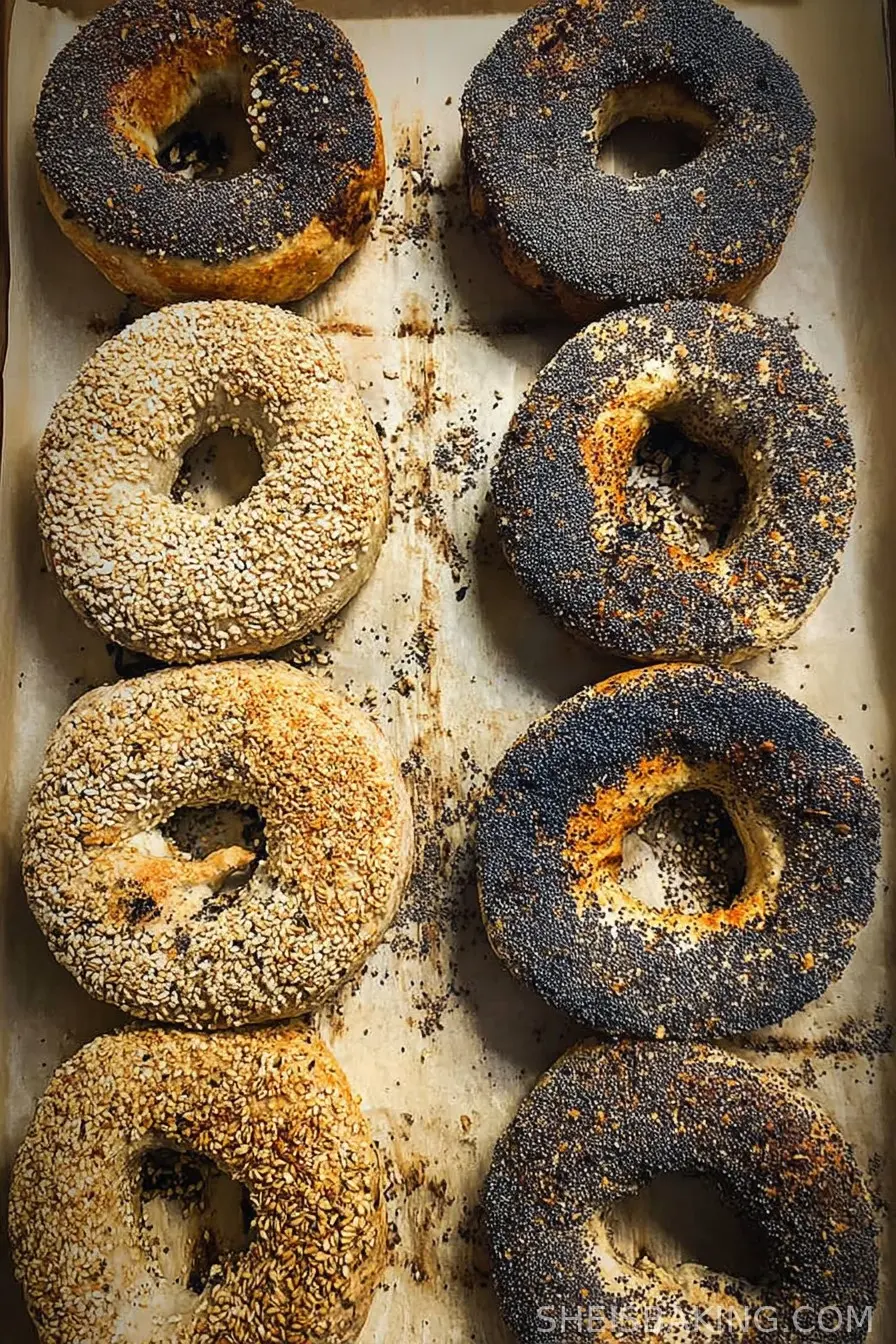
Unlike their New York counterparts, Montreal style bagels are hand-rolled, boiled in honey-infused water, then baked to perfection, creating a crisp exterior and a tender, dense inside that pairs beautifully with savory or sweet toppings.
The tradition of Montreal bagels dates back to the early 20th century with Eastern European Jewish immigrants bringing their craft and flavors to North America. Through the years, this method has earned a special place in Canadian culinary culture, with iconic bakeries like St-Viateur and Fairmount Bagel leading the way.
What sets the Montreal Style Bagel Recipe apart is the mix of high-quality bread flour, just the right touch of sweetness, and the signature honey water bath that yields their distinct glossy finish.
Whether you're seeking the nostalgia of visits to Montreal or searching for the perfect breakfast staple, this recipe will help you recreate an authentic batch of Montreal style bagels in your own kitchen.
Let's dive into the time-honored process, from mixing the dough to topping your bagels with sesame or poppy seeds, and discover what makes this bread so legendary.
Ingredients
- 415 grams warm water (approximately 1 ¾ cups)
- 2 ¼ teaspoons dry yeast (7 grams)
- 4 tablespoons sugar (50 grams)
- 700 grams bread flour (or all-purpose, approximately 5 ½ cups)
- 1 teaspoon kosher salt (6 grams)
- 2 tablespoons olive oil (30ml)
- Honey Water Bath:
- ¼ cup honey (85 grams)
- Enough water to fill a shallow pot
- Toppings:
- Sesame seeds
- Poppy seeds
- Everything bagel mix
Instructions
- Begin by activating the yeast. Pour 415 grams (1 ¾ cups) of warm water into a large measuring cup, ensuring the water is warm but not hot, around 100 to 110°F. Sprinkle in 2 ¼ teaspoons dry yeast and add 4 tablespoons sugar. Stir until the sugar is largely dissolved, then let the mixture sit for about 5 to 10 minutes to allow the yeast to foam and activate, indicating it's alive and ready to work.
- While the yeast is proofing, place 700 grams (about 5 ½ cups) bread flour into the bowl of your stand mixer (or use a large mixing bowl if preparing by hand). Add 1 teaspoon kosher salt and mix briefly to distribute the salt evenly throughout the flour.
- Once the yeast mixture is bubbly and aromatic, add it to the flour mixture. Pour in 2 tablespoons olive oil. Fit your stand mixer with a dough hook attachment and knead the dough on medium speed for 8 to 10 minutes. If kneading by hand, work the dough vigorously until it becomes smooth, elastic, and slightly tacky, but not overly sticky. If the dough seems too moist and does not come together, gradually incorporate more flour, a tablespoon at a time, until a soft but manageable dough forms.
- Shape the finished dough into a ball and lightly coat it with a thin layer of oil. Transfer it to a lightly oiled bowl or leave it in your mixer bowl, covering with plastic wrap or a damp kitchen towel. Set the bowl in a warm, draft-free location and allow the dough to rise for about 1 hour, or until it has doubled in size. Proper proofing is essential for a light, chewy interior.
- Once the dough has risen, punch it down gently to release excess air. With a kitchen scale, divide the dough into 12 equal pieces, each about 100 grams. Roll each piece into a tight, smooth ball. Let these rest, uncovered, on your countertop for 5 minutes, allowing the gluten to relax for easier shaping.
- To shape your bagels, take one rested dough ball and flatten it gently with your palm. Fold the sides inward, creating a rough rectangle shape. Roll up from the edge closest to you to create a tight cylinder or 'sausage' shape. Repeat for all pieces and allow the rolled cylinders to rest for 5 more minutes to relax the gluten further.
- Roll each cylinder with your palms on the counter to elongate it to about 8 to 10 inches in length. Overlap the ends by an inch or so, then roll back and forth under your hand to seamlessly join them, forming the iconic bagel ring. Place each formed bagel on a floured surface, cover them with a piece of plastic wrap or a towel, and let them rest for 30 to 45 minutes. In warmer kitchens, a slightly shorter rest is sufficient; you're looking for the rings to puff slightly.
- While the bagels finish proofing, preheat your oven to 450°F (230°C). Prepare the honey water bath by filling a wide, shallow pot with enough water to submerge your bagels comfortably. Add 2 tablespoons, or up to ¼ cup, of honey to the water. Bring this mixture to a gentle simmer over medium heat, stirring to dissolve the honey.
- Set up small individual plates with your chosen toppings, such as sesame seeds, poppy seeds, or everything bagel blend. Arrange a parchment-lined baking sheet nearby for your finished, topped bagels.
- Once the bagels have finished proofing and the water is simmering, gently lower one or two bagels into the honey water bath, taking care not to overcrowd the pot. Let each bagel cook for approximately 45 seconds on one side, then gently flip and cook for another 45 seconds on the opposite side. They will puff and develop a slight sheen as they simmer.
- Using a slotted spatula or spoon, lift each bagel from the honey bath and immediately place it into your prepared topping plate. Generously coat the top (or both sides, if desired) with your selected seeds or seasoning. Transfer each topped bagel to your parchment-lined baking sheet. Continue until all bagels are boiled and coated.
- Bake the bagels in your preheated oven for around 16 minutes, rotating the tray halfway through if needed for even browning. The bagels should emerge deeply golden, crisp, and aromatic. Remove them from the oven and let cool on a wire rack for at least 30 minutes before slicing. This resting time improves texture and makes cutting cleaner.
Nutritional Information
Montreal style bagels are a wonderful source of energy, primarily composed of complex carbohydrates from high-quality bread flour. Each bagel, prepared as directed in this recipe, contains approximately 250-300 calories, with some variance based on the size and specific toppings you choose.
The standard recipe provides modest amounts of protein (6-8 grams per bagel) and very little fat, as only a touch of olive oil is used for texture and flavor.
The honey and sugar add a balancing sweetness but still keep the overall sugar content fairly moderate compared to pastries or sweet rolls. While sodium is present due to the kosher salt, it is not excessive; careful home preparation allows you to control this quantity.
The added sesame and poppy seeds introduce vitamins, minerals, and healthy fats, contributing a subtle nutritional boost. Montreal style bagels are cholesterol-free and suitable for vegetarians, making them a popular breakfast or snack option for a range of dietary preferences.
If pairing with protein-rich fillings or creamy cheeses, you can craft a well-rounded, energizing meal to start your day.
Wine and Beverage Pairings
Montreal style bagels pair exceptionally well with a range of beverages, making them as versatile as they are delicious. Enjoy your bagel alongside a robust cup of freshly brewed coffee or a creamy latte for the quintessential breakfast experience.
For a classic Canadian touch, serve with hot black tea or an herbal infusion such as chamomile. If you prefer a cold pairing, a chilled glass of orange juice or a tart cranberry spritzer will brighten the bagel's subtly sweet notes.
For those enjoying bagels as part of a weekend brunch, sparkling wine or a crisp white wine like Sauvignon Blanc complements both the savory and slightly sweet elements of these iconic bagels.
For a special touch, a mimosa or a flute of Prosecco creates an elegant contrast to the dense, chewy texture of the bagel, while a cold glass of milk remains a comforting, family-friendly choice.
Cooking Tips and Variations
To achieve the authentic chewiness and golden crust characteristic of Montreal style bagels, the honey water bath is non-negotiable. For best results, use bread flour as specified-this higher gluten content ensures the dense yet supple crumb.
If you only have all-purpose flour, you'll produce a slightly softer but still delicious bagel. Accurately weighing ingredients with a kitchen scale improves consistency and reduces the risk of dry or sticky dough.
Don't forget the resting steps after shaping; allowing the gluten to relax leads to easier shaping and well-risen bagels. Bagel shaping can be tricky; make sure the ends are well joined, or they may separate during boiling.
Try a variety of toppings such as black sesame seeds, flaky salt, or even za'atar for an international twist. For a sweeter note, cinnamon sugar can be an unconventional yet satisfying option. If you prefer extra-crisp bagels, extend the baking time by 2-3 minutes, watching closely to avoid over-browning.
Montreal style bagels also freeze exceptionally well-slice and freeze them individually for easy weekday breakfasts.

Serving Suggestions
Montreal style bagels are incredibly versatile and can be enjoyed in a myriad of ways. Start your morning by serving them warm and sliced, simply slathered with fresh cream cheese for a classic combination.
For an authentic Montreal breakfast, add dill smoked salmon, thinly sliced red onion, capers, and a squeeze of lemon juice. These bagels are also wonderful toasted and spread with butter and jam, offering a sweet start to your day.
They make excellent bases for hearty sandwiches-fill with scrambled eggs, crisp bacon, or your favorite veggies for a satisfying brunch or lunch. For a lighter snack, top your bagel with ricotta, sliced ripe tomatoes, and a drizzle of olive oil.
When hosting guests, arrange a bagel platter featuring an assortment of toppings: whipped butter, a variety of cheeses, smoked fish, sliced cucumbers, olives, and pickles. Their unique flavor and texture make them an ideal addition to brunch buffets, picnics, or afternoon tea spreads.
For the freshest taste, serve the bagels within a few hours of baking, but don't hesitate to toast lightly before serving if they've been stored overnight.
Health Benefits
This Montreal Style Bagel Recipe offers more than just flavor; it also delivers a mix of nutritional benefits suitable for a balanced diet. The foundation of bread flour provides sustained energy from complex carbohydrates, while the relatively low fat content and absence of cholesterol align with heart-healthy eating habits.
The inclusion of olive oil supplies beneficial monounsaturated fats, which are known to support cardiovascular health. Seeds such as sesame and poppy, when used as toppings, add a boost of fiber, plant-based protein, and essential micronutrients like calcium, magnesium, and B vitamins.
Compared to store-bought, commercially produced bagels, this homemade recipe allows you to control both the type and quantity of ingredients, reducing unwanted additives and preservatives.
Pairing your bagel with nutrient-dense toppings such as smoked salmon or avocado can further enhance the meal's profile with omega-3 fatty acids, healthy fats, and even more fiber.
While bagels should be enjoyed in moderation as part of a balanced diet, preparing them at home ensures you know exactly what you're eating and can make choices that fit your individual health needs and preferences.
Frequently Asked Questions
Montreal style bagels are smaller, denser, and sweeter due to the honey water bath and the use of more sugar in the dough. They're also hand-rolled and baked in wood-fired ovens traditionally, resulting in a crisper crust compared to the softer New York style.
Yes, you can use all-purpose flour if bread flour is unavailable. The result will be a slightly softer bagel, but it will still be delicious and chewy.
Absolutely! Allow bagels to cool completely, then slice (if you prefer) and store in airtight freezer bags for up to three months. Toast directly from frozen for best results.
Properly kneaded dough should be smooth, elastic, and bounce back when pressed lightly. If it tears easily or feels sticky, knead for a few minutes longer, adding flour as needed.
Simmering the bagels in honey water before baking imparts a subtle sweetness and creates the signature glossy, chewy crust that sets Montreal style bagels apart from other varieties.
Mastering the Montreal Style Bagel Recipe at home brings a taste of Canadian tradition to your kitchen. By following each step with care-from activating the yeast and kneading the dough to the signature honey water bath and generous toppings-you'll create bagels bursting with authenticity. These bagels stand out thanks to their golden crust, dense yet tender crumb, and unmistakable flavor, making them perfect for any breakfast, brunch, or snack occasion. With the ability to customize toppings, tailor sizes, and experiment with creative pairings, homemade Montreal style bagels offer endless versatility and satisfaction. Savor them warm out of the oven with your favorite spreads or assemble a showstopping platter for family and friends. By baking them at home, you not only pay tribute to a culinary classic but also gain full control over freshness and ingredients, securing a spot for this timeless recipe in your regular baking routine. Enjoy the rewarding process and delicious results every time.
Ingredients
- 415 grams warm water (approximately 1 ¾ cups)
- 2 ¼ teaspoons dry yeast (7 grams)
- 4 tablespoons sugar (50 grams)
- 700 grams bread flour (or all-purpose, approximately 5 ½ cups)
- 1 teaspoon kosher salt (6 grams)
- 2 tablespoons olive oil (30ml)
- Honey Water Bath:
- ¼ cup honey (85 grams)
- Enough water to fill a shallow pot
- Toppings:
- Sesame seeds
- Poppy seeds
- Everything bagel mix
Instructions
-
1Begin by activating the yeast. Pour 415 grams (1 ¾ cups) of warm water into a large measuring cup, ensuring the water is warm but not hot, around 100 to 110°F. Sprinkle in 2 ¼ teaspoons dry yeast and add 4 tablespoons sugar. Stir until the sugar is largely dissolved, then let the mixture sit for about 5 to 10 minutes to allow the yeast to foam and activate, indicating it's alive and ready to work.
-
2While the yeast is proofing, place 700 grams (about 5 ½ cups) bread flour into the bowl of your stand mixer (or use a large mixing bowl if preparing by hand). Add 1 teaspoon kosher salt and mix briefly to distribute the salt evenly throughout the flour.
-
3Once the yeast mixture is bubbly and aromatic, add it to the flour mixture. Pour in 2 tablespoons olive oil. Fit your stand mixer with a dough hook attachment and knead the dough on medium speed for 8 to 10 minutes. If kneading by hand, work the dough vigorously until it becomes smooth, elastic, and slightly tacky, but not overly sticky. If the dough seems too moist and does not come together, gradually incorporate more flour, a tablespoon at a time, until a soft but manageable dough forms.
-
4Shape the finished dough into a ball and lightly coat it with a thin layer of oil. Transfer it to a lightly oiled bowl or leave it in your mixer bowl, covering with plastic wrap or a damp kitchen towel. Set the bowl in a warm, draft-free location and allow the dough to rise for about 1 hour, or until it has doubled in size. Proper proofing is essential for a light, chewy interior.
-
5Once the dough has risen, punch it down gently to release excess air. With a kitchen scale, divide the dough into 12 equal pieces, each about 100 grams. Roll each piece into a tight, smooth ball. Let these rest, uncovered, on your countertop for 5 minutes, allowing the gluten to relax for easier shaping.
-
6To shape your bagels, take one rested dough ball and flatten it gently with your palm. Fold the sides inward, creating a rough rectangle shape. Roll up from the edge closest to you to create a tight cylinder or 'sausage' shape. Repeat for all pieces and allow the rolled cylinders to rest for 5 more minutes to relax the gluten further.
-
7Roll each cylinder with your palms on the counter to elongate it to about 8 to 10 inches in length. Overlap the ends by an inch or so, then roll back and forth under your hand to seamlessly join them, forming the iconic bagel ring. Place each formed bagel on a floured surface, cover them with a piece of plastic wrap or a towel, and let them rest for 30 to 45 minutes. In warmer kitchens, a slightly shorter rest is sufficient; you're looking for the rings to puff slightly.
-
8While the bagels finish proofing, preheat your oven to 450°F (230°C). Prepare the honey water bath by filling a wide, shallow pot with enough water to submerge your bagels comfortably. Add 2 tablespoons, or up to ¼ cup, of honey to the water. Bring this mixture to a gentle simmer over medium heat, stirring to dissolve the honey.
-
9Set up small individual plates with your chosen toppings, such as sesame seeds, poppy seeds, or everything bagel blend. Arrange a parchment-lined baking sheet nearby for your finished, topped bagels.
-
10Once the bagels have finished proofing and the water is simmering, gently lower one or two bagels into the honey water bath, taking care not to overcrowd the pot. Let each bagel cook for approximately 45 seconds on one side, then gently flip and cook for another 45 seconds on the opposite side. They will puff and develop a slight sheen as they simmer.
-
11Using a slotted spatula or spoon, lift each bagel from the honey bath and immediately place it into your prepared topping plate. Generously coat the top (or both sides, if desired) with your selected seeds or seasoning. Transfer each topped bagel to your parchment-lined baking sheet. Continue until all bagels are boiled and coated.
-
12Bake the bagels in your preheated oven for around 16 minutes, rotating the tray halfway through if needed for even browning. The bagels should emerge deeply golden, crisp, and aromatic. Remove them from the oven and let cool on a wire rack for at least 30 minutes before slicing. This resting time improves texture and makes cutting cleaner.
Approximate Information for One Serving
Nutrition Disclaimers
Number of total servings shown is approximate. Actual number of servings will depend on your preferred portion sizes.
Nutritional values shown are general guidelines and reflect information for 1 serving using the ingredients listed, not including any optional ingredients. Actual macros may vary slightly depending on specific brands and types of ingredients used.
To determine the weight of one serving, prepare the recipe as instructed. Weigh the finished recipe, then divide the weight of the finished recipe (not including the weight of the container the food is in) by the desired number of servings. Result will be the weight of one serving.
Did you make this recipe?
Please consider Pinning it!

Leave a Reply